Create your first JHipster project
Previously in the “Better Java Projects Faster with JHipster and Docker” tutorial
In the first installment of the “Better Java Projects Faster with JHipster and Docker” tutorial, I laid out several common challenges that we Java developers face. You saw how JHipster helped me to overcome these challenges last year — and I showed you how you could master them, too. I also described how to customize the feature set of JHipster and defined situations where JHipster is probably not right for you.
Goals for this installment
In this second installment of the tutorial, we get hands-on: We produce a fully working, production-ready Java 11 application with Angular and Spring Boot, complete with unit tests and automated browser tests, ready for Continuous Integration and deployment into the cloud:
- We install the necessary software.
- We generate our first JHipster application.
- We explore the UI for administration and our entities.
About the sample application
The sample application has a few entities of an online shop. It’s enough to demonstrate the features of JHipster and Docker, but it’s a far cry from a real online shop. 😄
The application is also available on GitHub. It has branches for every stage of every tutorial installment so that you can follow along if you ever get stuck.
The generated application uses two open source databases: the embedded database H2 for development and PostgreSQL for production. The front end is Angular. JHipster also generates unit tests for Java and Angular and end-to-end tests that run in the browser.
What kind of computer do you need?
You need a Windows PC or Mac for this tutorial. You must be able to install software on this machine, possibly with administrator or root access.
I tested this tutorial on the latest versions of Windows 10 and macOS Monterey (12.6). It should also work with older versions of both Windows and macOS, but I cannot vouch for that.
Installing Java 17
I recommend you use Java 17 JDK. If you don‘t have a Java 17 JDK installed already, I recommend Eclipse Temurin 17, formerly known as AdoptOpenJDK. The site has installers for Windows, Mac, and Linux. Please follow the instructions.
After the installation, please verify in a command prompt/terminal that java -version shows Java 11. As of October 3, 2022, this
is 17.0.4.1 for Eclipse Temurin:
openjdk version "17.0.4.1" 2022-08-12
OpenJDK Runtime Environment Temurin-17.0.4.1+1 (build 17.0.4.1+1)
OpenJDK 64-Bit Server VM Temurin-17.0.4.1+1 (build 17.0.4.1+1, mixed mode)
Installing Node.js & npm
Node.js is a JavaScript runtime environment based on the Google Chrome JavaScript Engine. In other words: Node.js is the “JDK for JavaScript.” npm refers to three different, but related things: A JavaScript library package format, a JavaScript build tool, and a public JavaScript component repository. So npm is “The JAR format and Maven and Maven Central for JavaScript.”
Please download the LTS version of the Node.js installer. As of October 3, 2022, this
is 16.7.1. After the installation, please verify that node -v shows v16.7.1.
On macOS, you could also use Homebrew to install Node.js.
Installing JHipster
With npm in place, you can finally install JHipster: npm install -g generator-jhipster. Please verify the installation in a
command prompt/terminal with jhipster --version. This shows version 7.9.3 as of October 3, 2022.
Installing Git
Git is the most popular source control system. You need it here because JHipster creates a Git project and actively uses Git during upgrades (where JHipster creates and merges a branch).
If you don’t have Git installed already, then please install it:
- Windows Install the 64-bit or 32-bit Git for Windows Setup.
- macOS If you have Homebrew installed, then go for
brew install git. Otherwise, use the macOS installer.
You don’t need the very latest version of Git for this tutorial. As of October 3, 2022, this version is 2.37.3, as revealed by git --version.
Installing Docker Desktop
Docker runs our app in containers. JHipster creates a Docker deployment by default. So we need Docker on our PC.
Please download Docker Desktop if you haven’t done so. You may need a commercial license for using it — please check the Docker License FAQ for that. JHipster needs Docker Desktop running during the application creation.
Creating the application
Now we are finally ready to generate our first JHipster application!
Please create a tutorial-jhipster-docker directory on your computer for our starter project. Then create a file called
simple-shop-app.jdl in that directory and
paste the content from GitHub
into it. We will examine this file in more detail in a future tutorial installment. Suffice to say, this file now contains all the
information JHipster needs to generate our project.
Now open a command prompt/terminal and change to the newly-created tutorial-jhipster-docker directory. Type jhipster import-jdl simple-shop-app.jdl to create your first JHipster application using these steps:
- Source file generation JHipster creates source files for Spring Boot and Angular, configuration files, and build files for Gradle and npm.
- npm module installation Angular projects use many npm libraries. npm downloads them
(through
npm install), which takes a couple of minutes. - Git project creation The final step initializes a local Git project.
If everything goes fine, then you see the following output in your terminal:
[...]

INFO! The JDL has been successfully parsed
INFO! Generating 1 application.

[...]

Git repository initialized.

[...]

Server application generated successfully.

[...]

Client application generated successfully.

[...]

Entity Product generated successfully.
Entity Address generated successfully.
Entity ShoppingOrder generated successfully.
Entity ProductOrder generated successfully.
Entity Shipment generated successfully.
INFO! Generator app succeed
INFO! Generating 1 deployment.

[...]

✔ Docker is installed

[...]

Docker Compose configuration successfully generated!

[...]

INFO! Generator docker-compose succeed
Congratulations, JHipster execution is complete!
Congratulations — you just created your first JHipster project! 🎉
Your project should now have the same files as
the GitHub project on the master branch. Note: Git ignores
the two build directories (node_modules for npm and build for Gradle).
Running the application
Now let’s run the application we just created. Technically, we have a Spring Boot application with an embedded React front end and Maven as the build system. JHipster allows you to use Gradle, too. I personally like Gradle better, but Maven is way more popular. You don’t need to install Gradle, though, since the application uses the so-called “Gradle wrapper.” This is a batch file for Windows and a shell script for macOS / Linux which downloads a specific Gradle version on the fly if need be.
So please go back to the command prompt/terminal and the same tutorial-jhipster-docker
directory. Then type mvnw (Windows) or ./mvnw (macOS) to start the application. This starts
the Maven build which
- downloads missing npm packages,
- builds the React application,
- generates Java resources (like mapper classes for Data Transfer Objects),
- compiles the Java code, and
- starts the Spring Boot application on port 8080.
If everything works well, then you see the following output in your command prompt/terminal:
----------------------------------------------------------
        Application 'my_simple_shop' is running! Access URLs:
        Local:          http://localhost:8080/
        External:       http://[your IP address]:8080/
        Profile(s):     [dev, swagger]
----------------------------------------------------------
As of October 3, 2022, there’s a bug in JHipster which prevents the creation of test data for two entities. If that happens, you’ll see an error like this:
2022-10-03T09:52:19.581+01:00 ERROR 55275 --- [ple-shop-task-1] t.j.c.liquibase.AsyncSpringLiquibase     : Liquibase could not start correctly, your database is NOT ready: liquibase.exception.MigrationFailedException: Migration failed for changeset config/liquibase/changelog/20221003084643_added_entity_constraints_ProductOrder.xml::20221003084643-2::jhipster:_     Reason: liquibase.exception.DatabaseException: Referential integrity constraint violation: "FK_PRODUCT_ORDER__PRODUCT_ID: PUBLIC.PRODUCT_ORDER FOREIGN KEY(PRODUCT_ID) REFERENCES PUBLIC.PRODUCT(ID)"; SQL statement:_ALTER TABLE PUBLIC.product_order ADD CONSTRAINT fk_product_order__product_id FOREIGN KEY (product_id) REFERENCES PUBLIC.product (id) [23506-214] [Failed SQL: (23506) ALTER TABLE PUBLIC.product_order ADD CONSTRAINT fk_product_order__product_id FOREIGN KEY (product_id) REFERENCES PUBLIC.product (id)]

[...]

Caused by: org.h2.jdbc.JdbcSQLIntegrityConstraintViolationException: Referential integrity constraint violation: "FK_PRODUCT_ORDER__PRODUCT_ID: PUBLIC.PRODUCT_ORDER FOREIGN KEY(PRODUCT_ID) REFERENCES PUBLIC.PRODUCT(ID)"; SQL statement:
ALTER TABLE PUBLIC.product_order ADD CONSTRAINT fk_product_order__product_id FOREIGN KEY (product_id) REFERENCES PUBLIC.product (id) [23506-214]
Here’s how to fix this:
- Stop the application.
- Open
src/main/resources/cocat src/main/resources/config/liquibase/fake-data/product.csvin an editor. - Verify that the file only has a heading, no data rows.
- Paste the content of
product.csvfrom my repository into the file. - Save the file file.
- Run the clean target to delete the current embedded database:
mvnw clean(Windows) or./mvnw clean(macOS)` - Start the application again with
mvnw(Windows) or./mvnw(macOS).
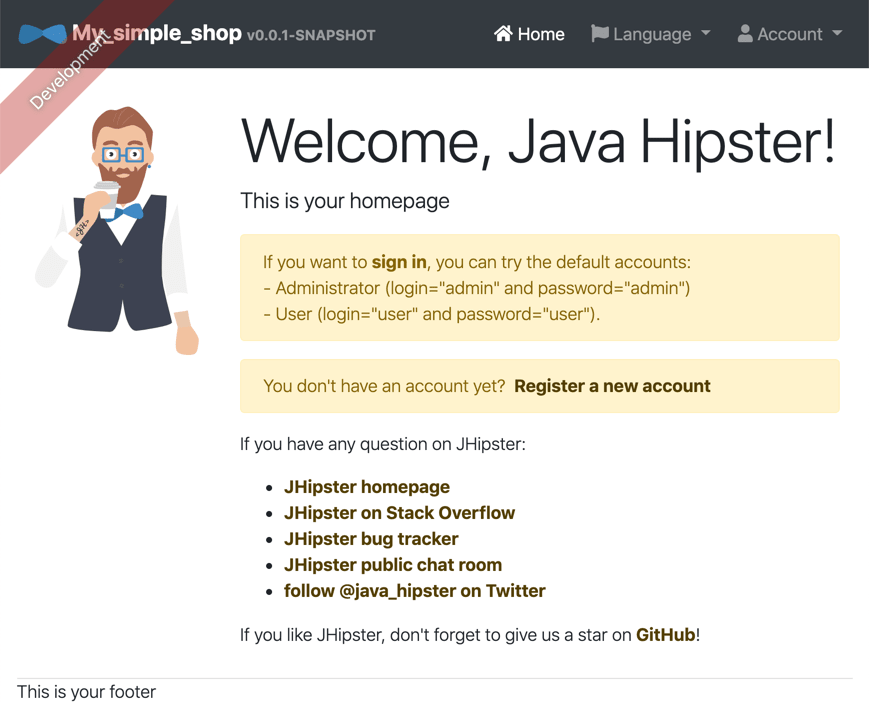
Now open http://127.0.0.1:8080 in your browser. The application loads and you should see a screen like this:

Please note: All screenshots on this page are a bit outdated since they were generated with earlier versions of JHipster and used Angular!
You may see a different “Hipster image.” JHipster picks one randomly out of a collection of four.
Congratulations — you just ran your first JHipster project! 🎉
Exploring the application layout
Let’s look at the front end application layout in more detail:
- In the top left, you find the application name “My_simple_shop” (defined in the localization resource bundle), the version number “v0.0.1-SNAPSHOT” (which is the Gradle project version number), and the red “Development” banner (which reminds you that you run the `dev profile in Spring Boot). o n the top right, you have the nav bar. There, you can switch languages (Language) and log in (Account).
- A JHipster logo and some explanations take up the main content area.
- The footer (This is your footer) is where it belongs – at the bottom.
The application has a responsive layout. Here’s the same application on an iPhone 6-size device, rendered by Chrome on the desktop and stitched together from two screenshots:

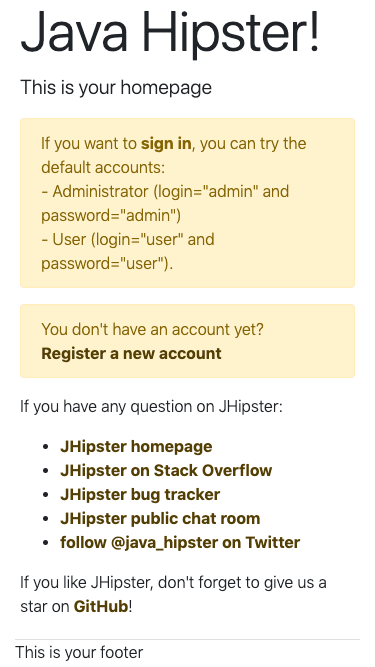
That already looks pretty solid: The nav bar turned into the (in)famous “hamburger menu,” and the main area changed to a single column layout. The application name and version are too long, though, and push the hamburger menu to a second line.
Exploring the administration section
JHipster created two default users: admin / admin and user / user, corresponding with the default
Spring Security user roles of ROLE_ADMIN and ROLE_USER. You can probably guess what these users are
allowed to do, so let’s log in as admin and look at the administration menu:
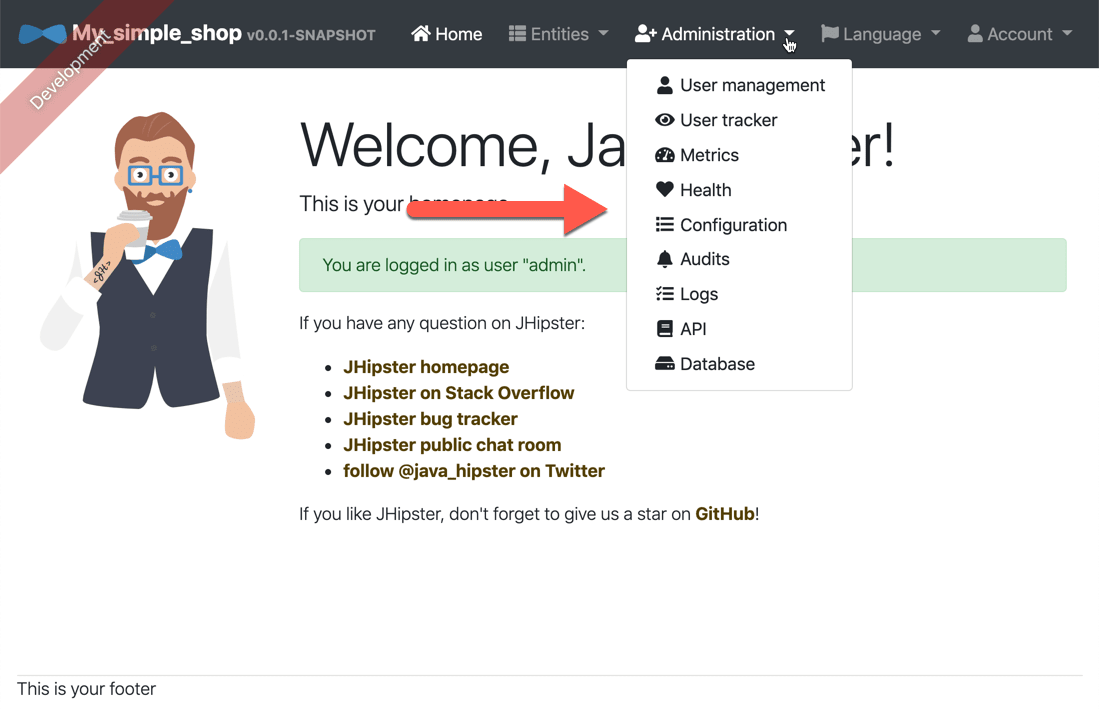
In the first installment of this tutorial, I stated:
we now sometimes have to build administration and scalability features that we used to take for granted.
When it comes to administration, JHipster already did all the hard work for us, giving us many features for free! Let’s take a look at them one at a time.
In User management, you do exactly what you expect — manage users:
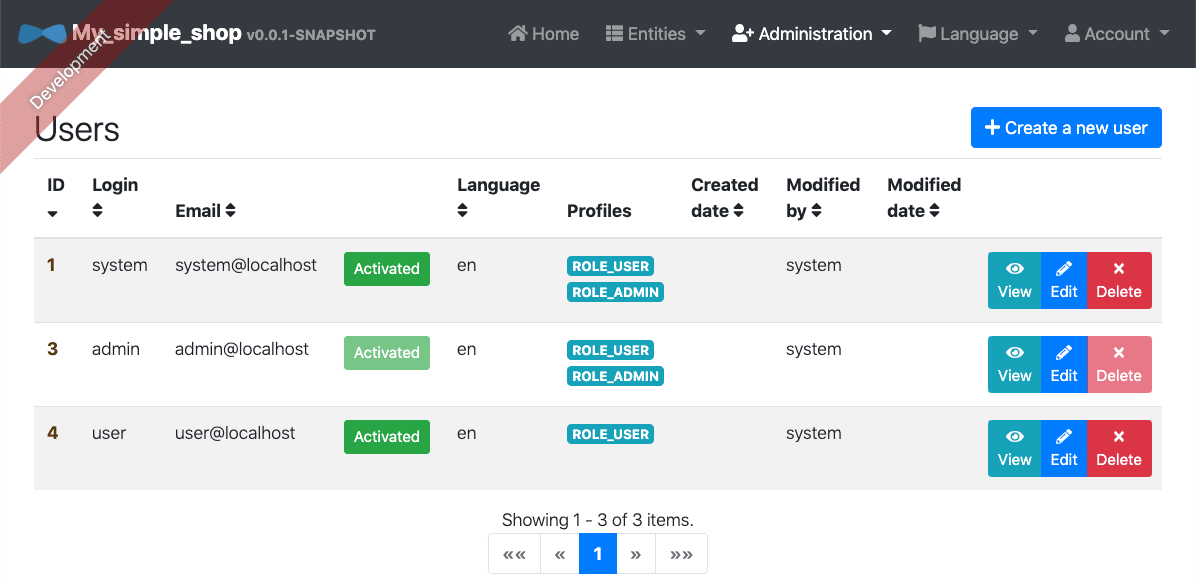
We already mentioned the admin and user users. The system user comes into play for background
tasks and database set-up.
User tracker shows you in real-time which other users are logged in and what page they’re on:
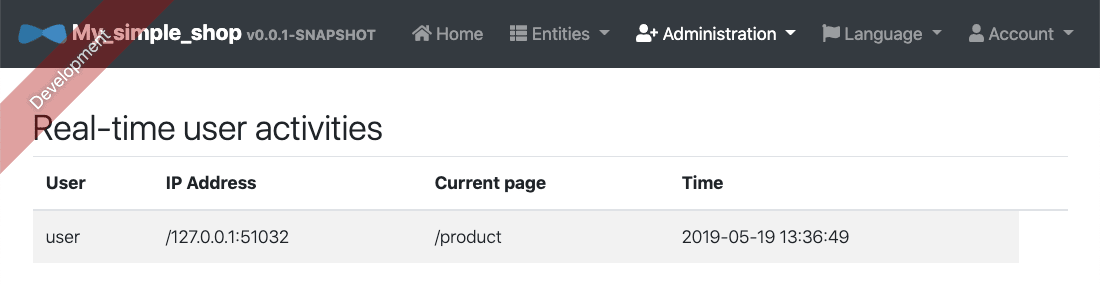
Here we see the user login, active in another browser, on the product page.
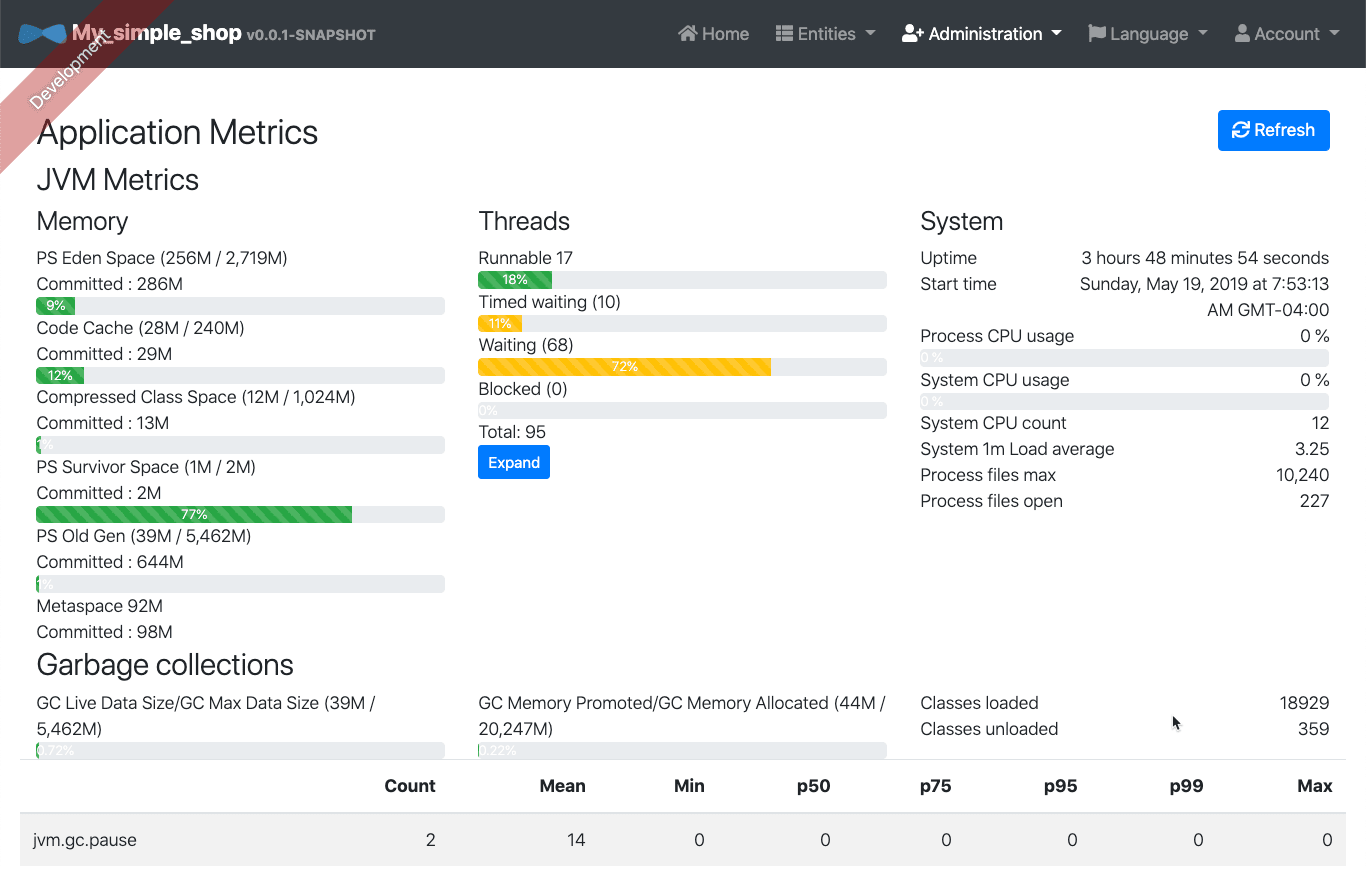
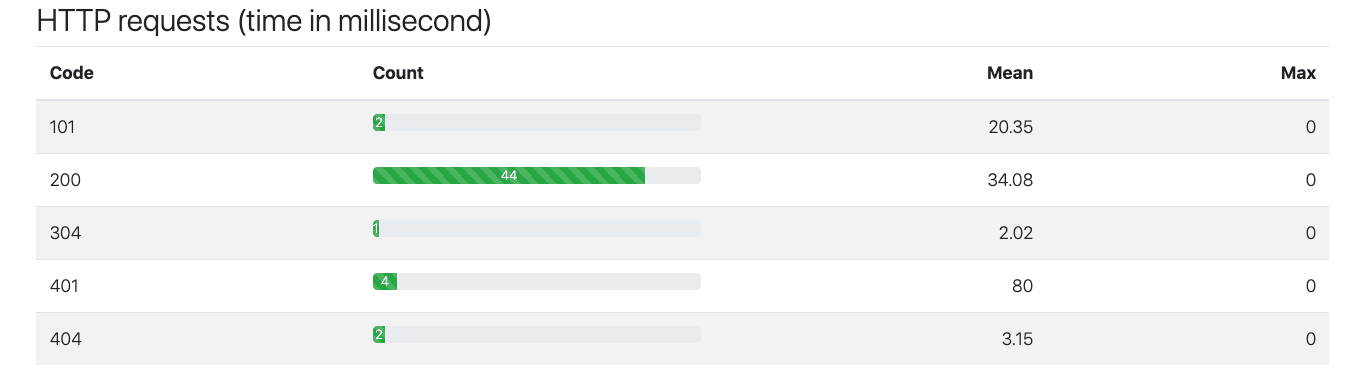
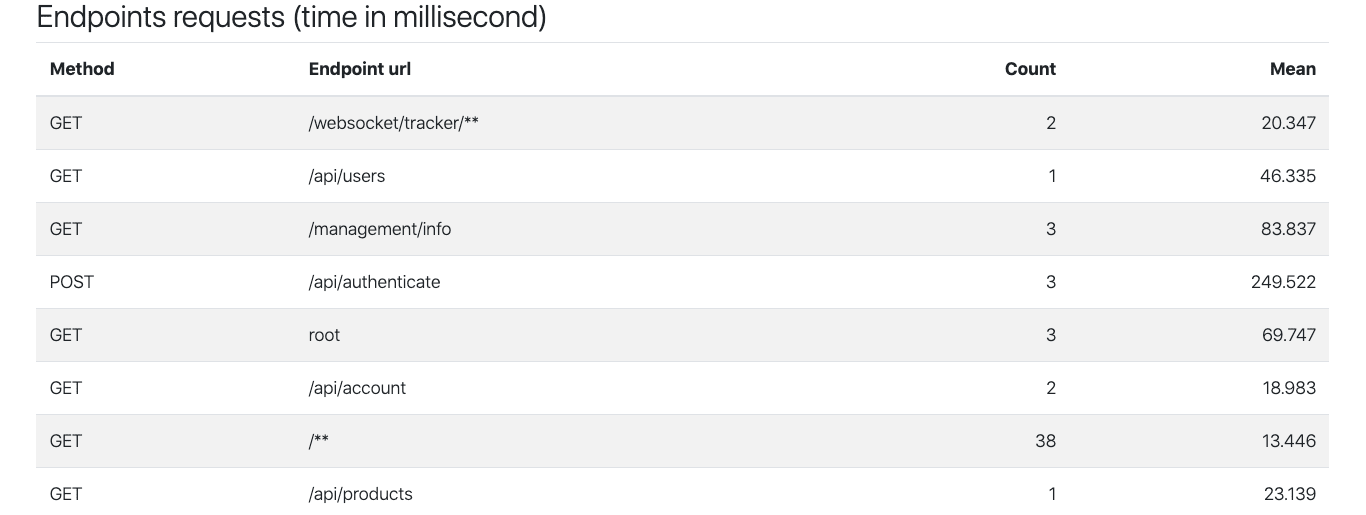
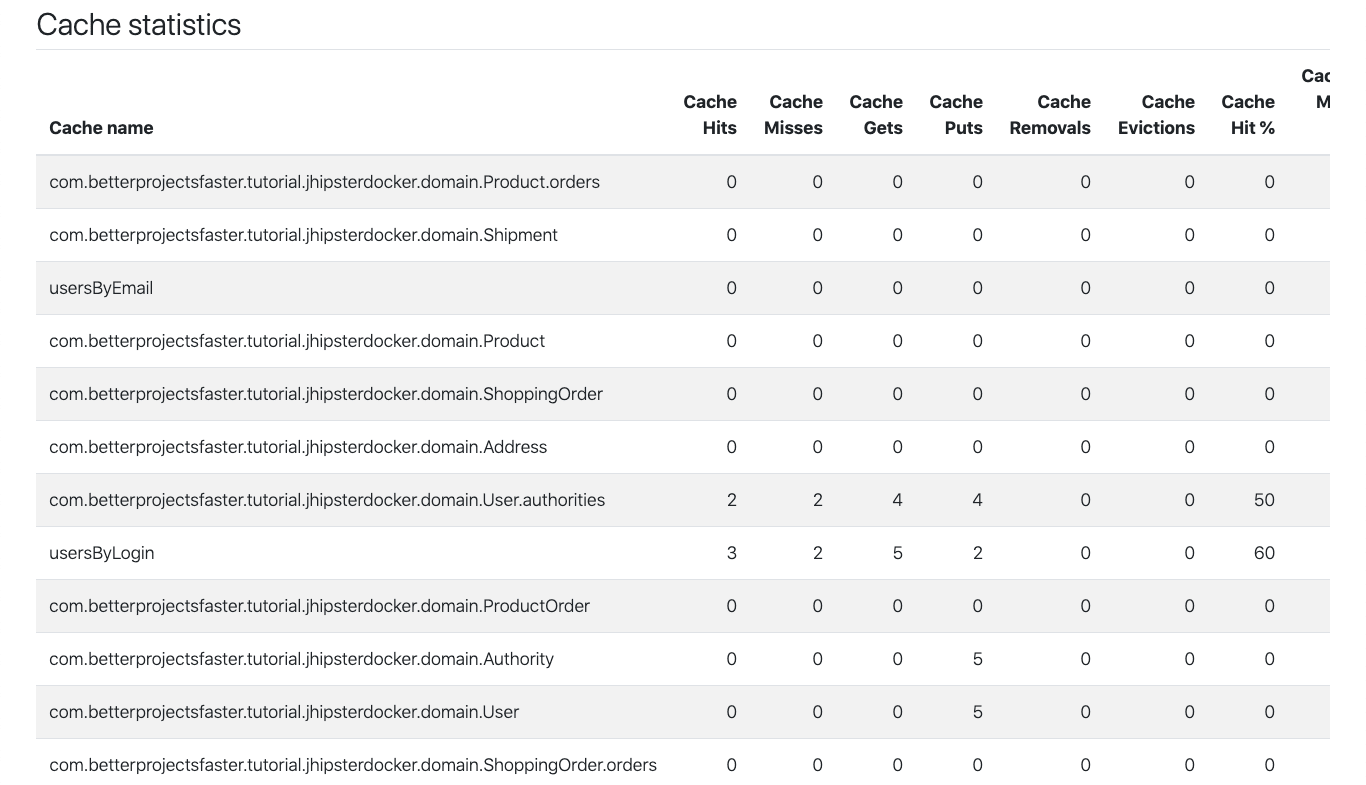
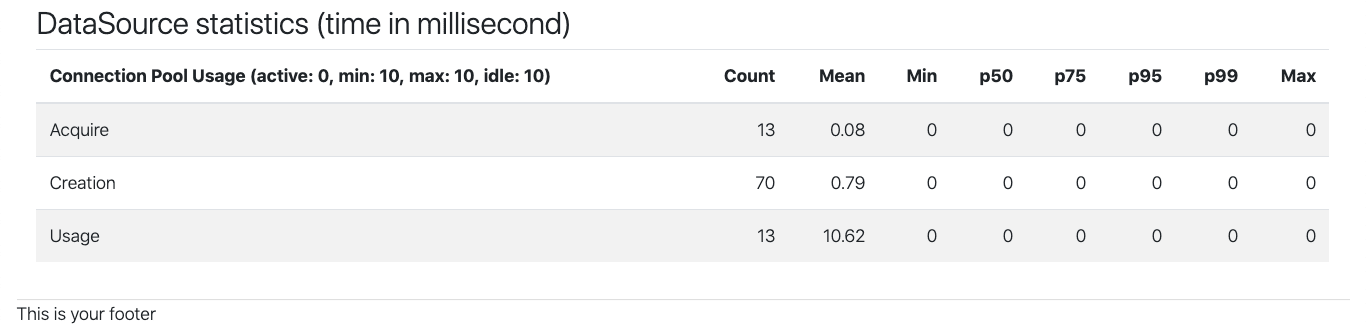
Next are the Application Metrics: JVM statistics, garbage collection information, HTTP & REST endpoint statistics, Hibernate cache information, and JDBC connection pool statistics.
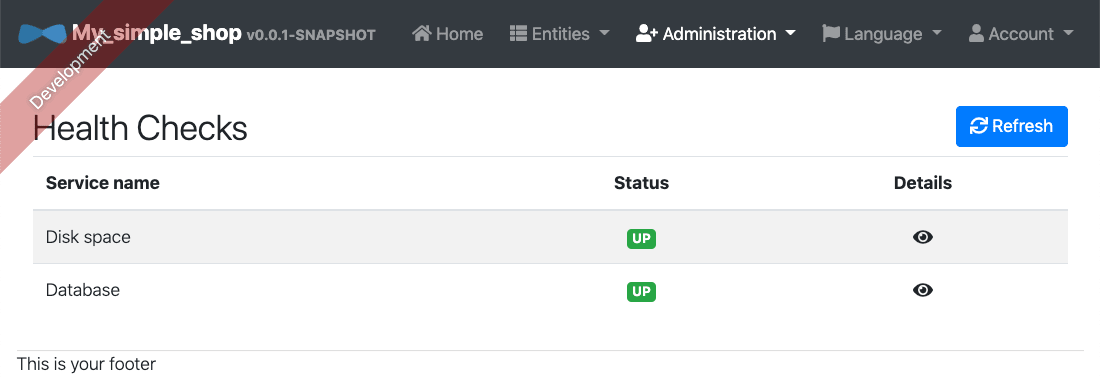
The Health Checks tell you about free disk space and whether your database is OK. Details lurk behind the eye icon:
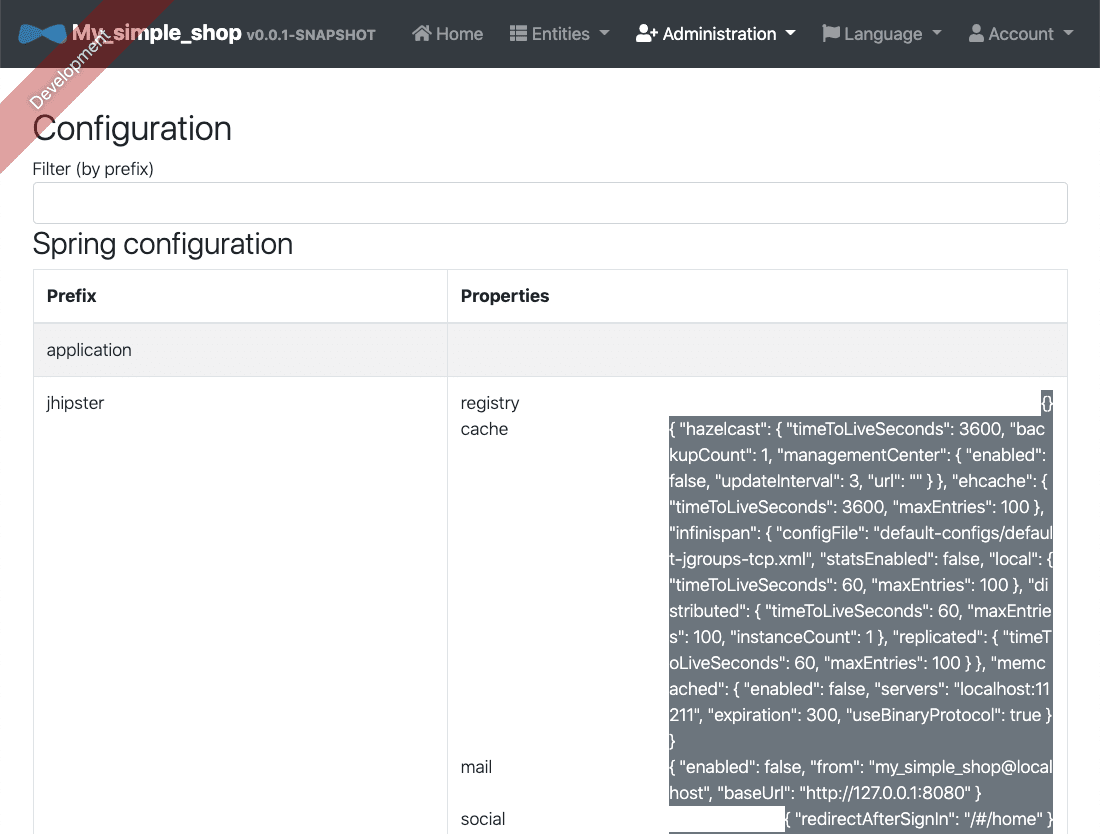
The Configuration screen lists all your “code settings”: Spring configuration, environment variables, configuration files, and even Git properties. This screenshot shows just the tip of the iceberg:
The Logs contains a fantastic troubleshooting tool: You can set the log level of every single Java class in your application in real-time:
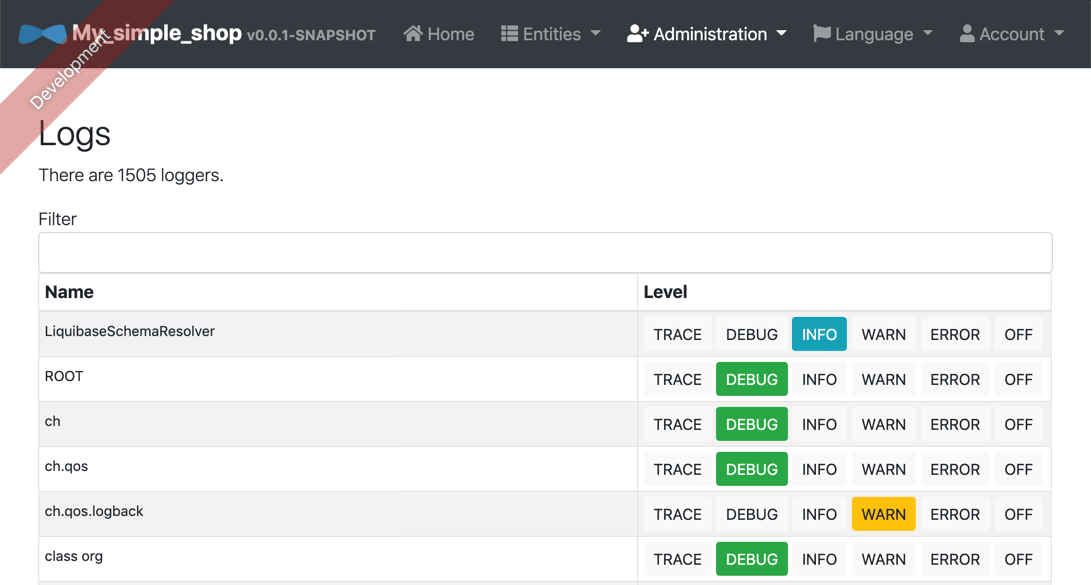
So why is that useful again? Let’s imagine your application has a bug in production, and you need to
find out what’s going on. Since your methods log their input parameters, you can find out through
the log file. Case closed! Well, not so fast: Your methods log at DEBUG level — and in
production, you run at INFO level, so the input parameters you need so desperately don’t appear in the
log file. Now what?
You change the log level to DEBUG in your config file, restart the application,
reproduce the error, change the config file log level back to INFO again, and restart the application
once more. That’s two config file changes and two restarts – which is inconvenient at best and disastrous
at worst, if you make a wrong change to the config file.
But with this screen, you simply change the log level of the classes you need to DEBUG, reproduce the
error, and then change the log level back to INFO. No restarts, no config file changes, no wasted
time! I spent years in production support and would have given my right arm for such a feature!
API lists all the REST endpoints in Spring Boot. This includes the endpoints for built-in functionality (such as the administration area) and the endpoints created for our data model in the JDL file. Below you see the details of the “Address” API:

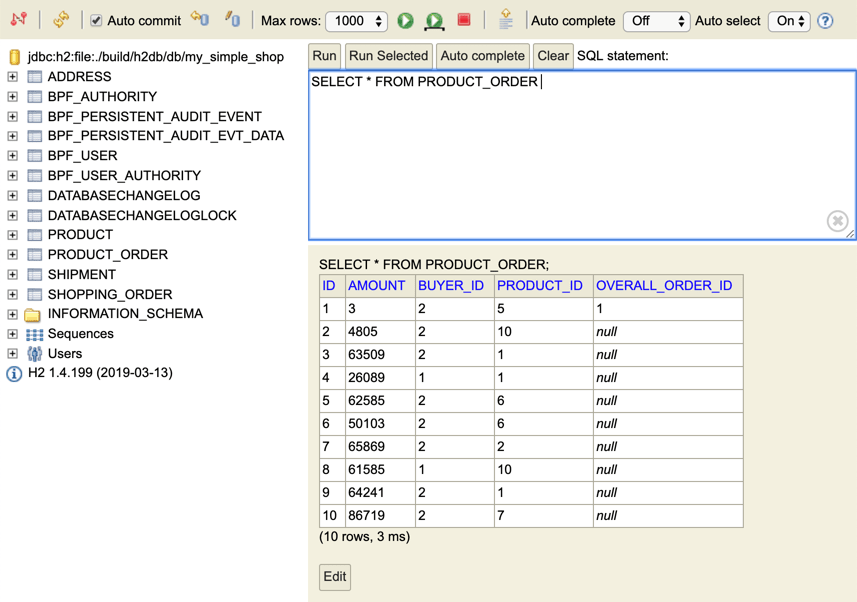
The final entry, Database, is only available in the “dev” profile and leads to the web client of the embedded H2 database. It has the database tables of our application on the left, a SQL statement on the right, and the statement result at the bottom:
This concludes our exploration of all the administration features — which JHipster gives us for free!
Exploring the entities
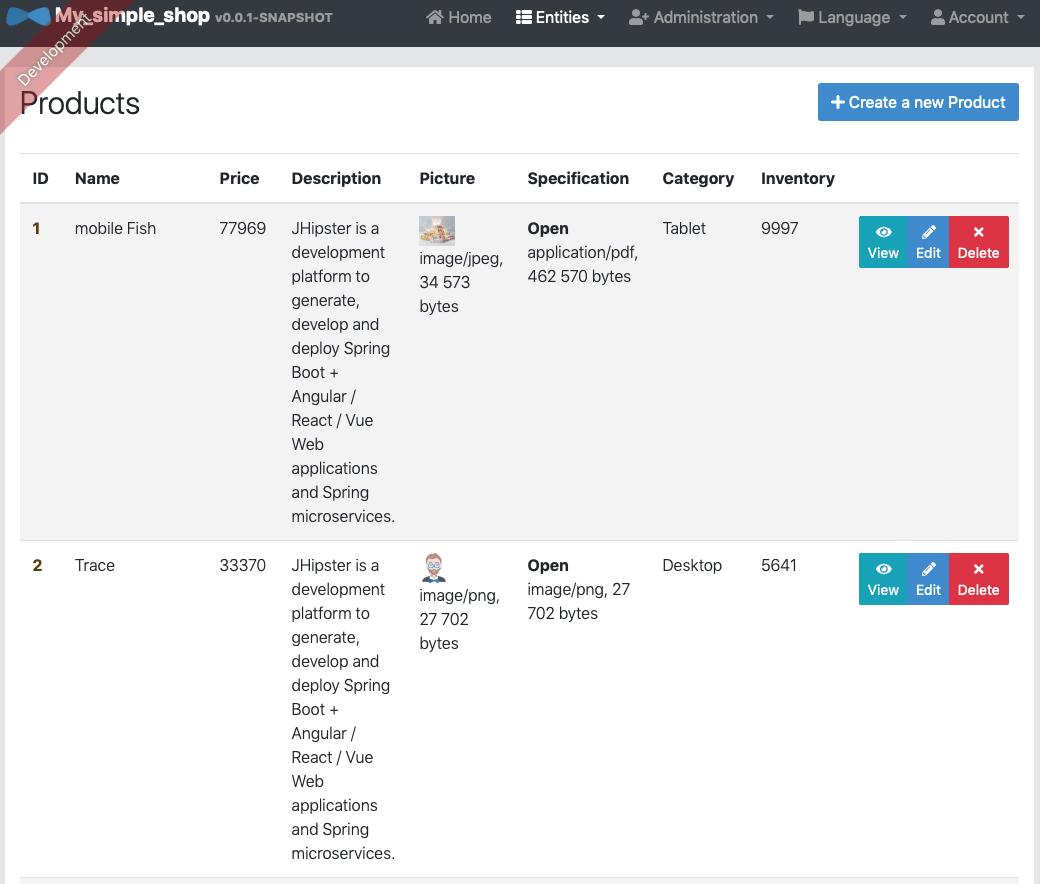
Please go to the Entities menu in the application. That menu contains the overview pages of all the entities that were generated from our data model. Please select Product This shows you all the products.
- The first page is the overview page where you see a table with all the entities. JHipster generated a table for us with all entity fields and three buttons for view, editing and deleting on the right. Please note that the table shows an image thumbnail in the Picture column. We also have download links in the Picture and Specification columns. Now where does all that data come from? This is “fake data” — a new feature in JHipster 6.0 (I know, but the JHipster picked that name, not me!). JHipster generates this “fake data” when the entity is first generated.
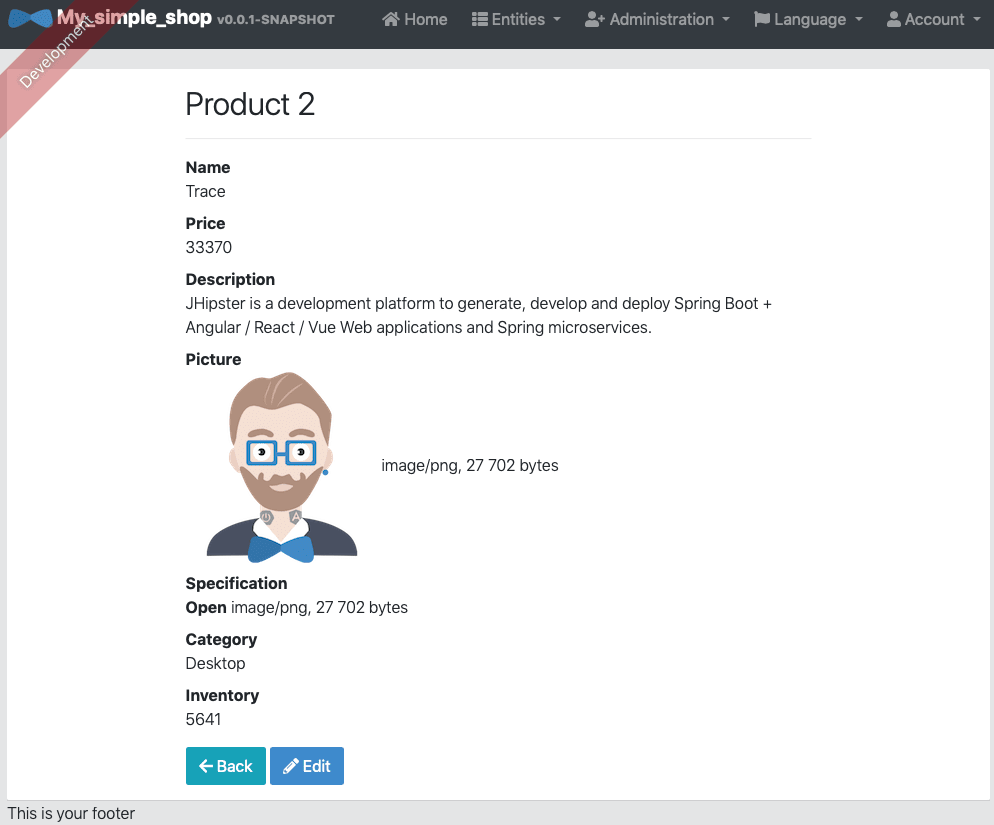
- Now click on the View button of a row to see the detail page. Just like in the overview page, you get all fields, the picture (now bigger) and download links. You also have Back and Edit buttons at the bottom:
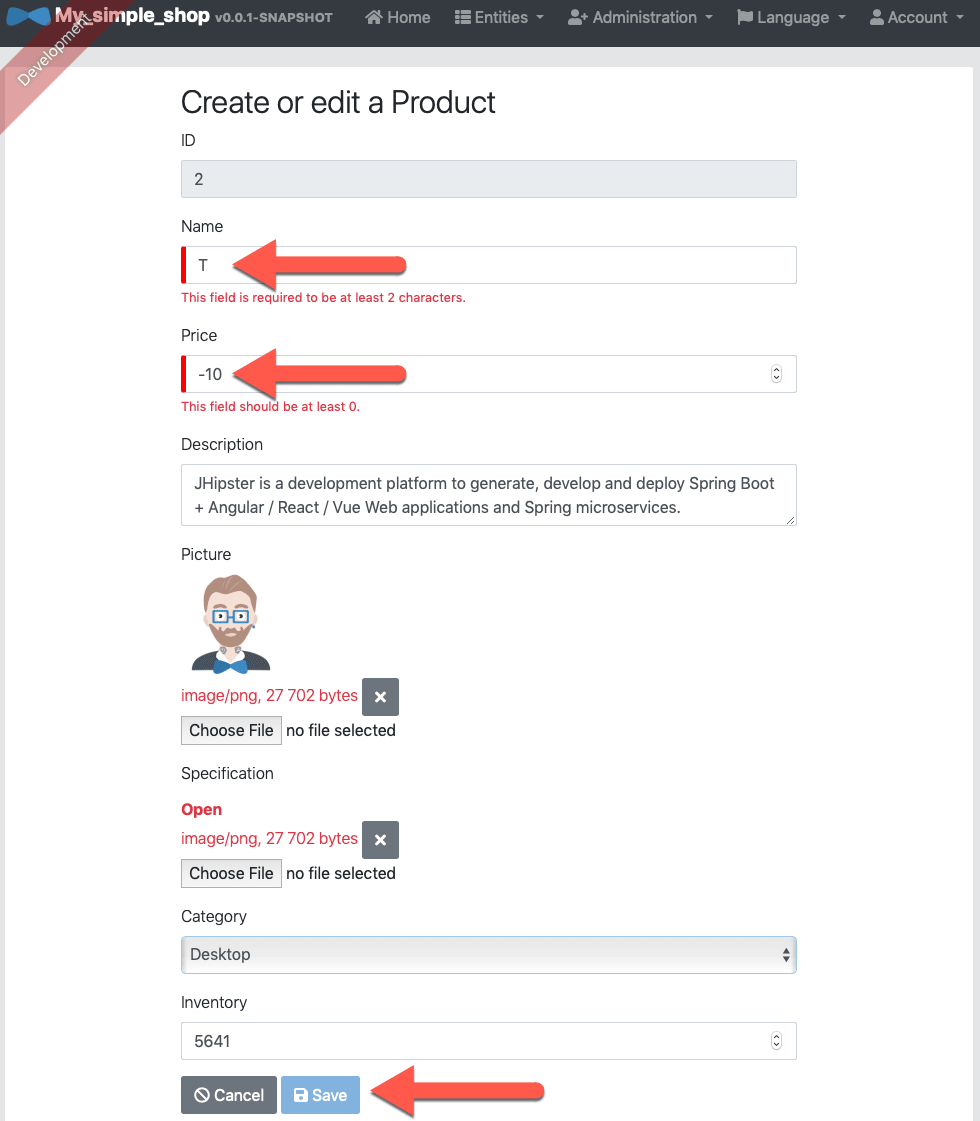
- Now click on the Edit button at the bottom to get to the combined create & update page. In the screenshot below I demonstrate
three validation features:
- In the JDL file we used to generate the application, the Name field is set to a minimum length of 2. I just have one character there, hence the first error.
- The Price field must be greater than or equal to 0, so the “-10” leads to the second error.
- Because our form contains errors, the Save button at the very bottom is disabled.
Feel free to explore the other entities, they all use the same layout. This is the end of our application exploration.
Wrap-up
This wraps up the second tutorial installment. What have we accomplished here?
- We installed the necessary software.
- We generated our first JHipster application.
- We explored the UI for administration and our entities.
Your project source code should look like
the “master” branch of the GitHub project.
Coming up next in the “Better Java Projects Faster with JHipster and Docker” tutorial
In the next installment, we’ll open and run the project in both Eclipse and IntelliJ. We’ll also explore the source code. Stay tuned!
Part 2 of 3
in the
Tutorial: Better Java Projects Faster with JHipster and Docker series.
« Explore the JHipster code
|
How JHipster and Docker saved my first Angular Java project »
| Start: How JHipster and Docker saved my first Angular Java project
Developer job ads down 32% year over year, Stack Overflow questions dropped 55% since ChatGPT. I now recommend IntelliJ Community Edition because many AI code assistants don't run in Eclipse. Job ads for Quarkus hit an all-time high.
Read my newsletter