Previously in the “Better Java Projects Faster with JHipster and Docker” tutorial
In
the second installment of the “Better Java Projects Faster with JHipster and Docker” tutorial,
we first installed all the software we need. Then we generated and ran the JHipster application. Finally, we explored its
administration and entity sections. Your project source code should look like
the “master” branch of the GitHub project.
This Tutorial Entry Is Outdated!
Originally, the tutorial used Gradle as the build file and Angular as the front-end. On June 15, 2021, I switched to Maven and React because they are both way more popular. Both the screenshots and the text still describe Gradle and the older Angular UI.
Goals for this installment
In this third installment of the tutorial, we look at the JHipster code in our IDE:
- We install or configure either Eclipse or IntelliJ for Spring Boot and Angular.
- We import the project into either Eclipse or IntelliJ.
- We inspect the code that JHipster created for our entities.
How to build the project with IDEs?
Before we import our JHipster project into an IDE, we have to decide how to build it in the IDE. We have two options:
- Use IDE build
The IDE analyzes our project and mimics the Gradle build steps — such as compiling Java code or creating a JAR file — with its own build actions. - Use Gradle build
The IDE runs the very same Gradle project we run from the command line.
The main advantage of the IDE build is a possible gain in elegance and speed: The IDE can launch its internal build actions quicker and interpret its results easier, compared to kicking off an entire Gradle build and sifting through its output. But there are many drawbacks, too:
- Two different builds
On the one hand, developers now use one build system in their day-to-day work — the IDE build system. On the other hand, the Continuous Integration (CI) server uses a different build system — Gradle. And if your CI server doesn’t build your release files, then you’ll probably do that from a terminal with Gradle, too. At best, these dual build systems just result in duplicate work. At worst, this leads to differences in application behavior, bugs, and problems. - Complexity in IDE
The IDE can only mimic Gradle if it does indeed have an internal build action for every Gradle build step. That is not a given. Take Mapstruct, for instance, which translates Java entity files into Data Transfer Objects (DTOs) and back. Our tutorial project uses Mapstruct, so the IDE build system needs to run Mapstruct, too. Spoiler alert: Neither Eclipse nor IntelliJ does that out of the box, and they both require plugins. But wait, there’s more: Gradle makes it easy to customize your build by putting small methods directly into your Gradle build files. A method here, a method there, and pretty soon you’re talking real build customization. How is the IDE supposed to handle this?!
To stick with one build system and to avoid this complexity in the IDE, we will use the Gradle build inside Eclipse and IntelliJ, too.
IDE project files in Git
Both Eclipse and IntelliJ create files inside our tutorial project to store settings and preferences. Through the magic of
.gitignore,
these files are not stored in Git. I think this is the right call for our tutorial project.
IntelliJ recommends sharing project files selectively through Git. I ran into issues with that: We sometimes inadvertently shared our Run Configurations which contained local JDK names and extra JVM parameters and therefore didn’t work on somebody else’s machine.
Our Java IDEs: Eclipse & IntelliJ
I cover how to import and run the tutorial project in the two most widely used IDEs: Eclipse and IntelliJ. I expect you to use just either of these two, so please feel free to skip the sections on the other IDE.
We start with Eclipse.
Eclipse: Existing Installation
If you prefer Eclipse as your IDE and already have it installed, then you need plug-ins for Angular and Spring Boot. If you don’t have them, then please see the next section for instructions on how to install the “Spring Tools” and “Angular Eclipse” plug-ins. After that, please continue with the Eclipse: Changing the Global Configuration section.
Eclipse: New Installation
If you prefer Eclipse as your IDE and don’t have it installed, then head over to the Eclipse package selection and download the Eclipse IDE for Java Developers. It is version “2019-06 R” as of August 15, 2019. Then please install it on your machine:
- Windows
Unzip the archive to a directory on your hard disk. - Mac
Open the installer image and drag the application into your Applications folder.
Now install two free plug-ins for Angular and Spring Boot:
- In Eclipse, go to the Help - Eclipse Marketplace… menu.
- Paste the following URL into the Find: field to show the “Spring Tools” plug-in (version 4.3.1
as of August 15, 2019):
https://marketplace.eclipse.org/content/spring-tools-4-spring-boot-aka-spring-tool-suite-4 - Hit “Enter.” You should now see the “Spring Tools” plug-in:
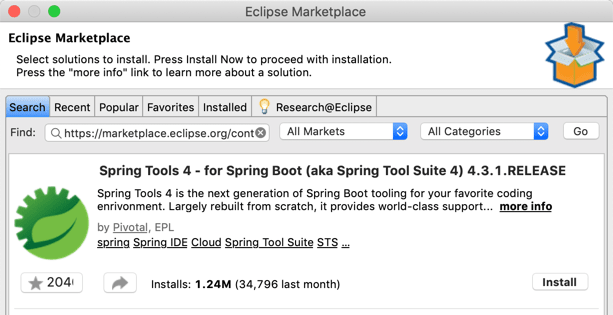
- Click the Install button to add this the plug-in, follow the instructions and restart Eclipse.
- Go to the Help - Eclipse Marketplace… menu again and paste this URL into the Find: field
for the “Angular Eclipse” plug-in (version 1.3.0 as of August 15, 2019):
https://marketplace.eclipse.org/content/angular-eclipse - Hit “Enter” to see the “Angular Eclipse” plug-in:

- Install this plug-in, too, and restart Eclipse once more.
Now you have all the necessary software installed, so let’s move on to configuring Eclipse.
Eclipse: Changing the Global Configuration
Now we need to make sure that Eclipse can actually run our JHipster project with JDK 11:
- Open the Eclipse preferences. On Windows, that’s Window — Preferences, on macOS, it’s Eclipse — Preferences…
- Go to Java — Installed JREs and make sure that JDK 11 is the default JRE:

- Now go to Gradle and make sure to select Gradle wrapper as the Gradle distribution:

- Push Apply and Close to save your settings.
Eclipse: Importing the tutorial project
Let’s get the tutorial project into Eclipse:
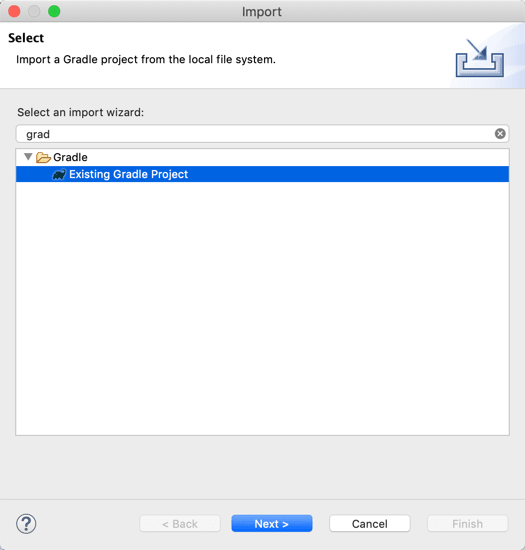
- Select the File — Import… menu. Then type “grad” until the Gradle — Existing Gradle Project option is highlighted. Select it:
- Now push Next > to get to a Gradle information screen. We already implemented the most import recommendation in the previous section — to use the Gradle wrapper. Just push Next > again:

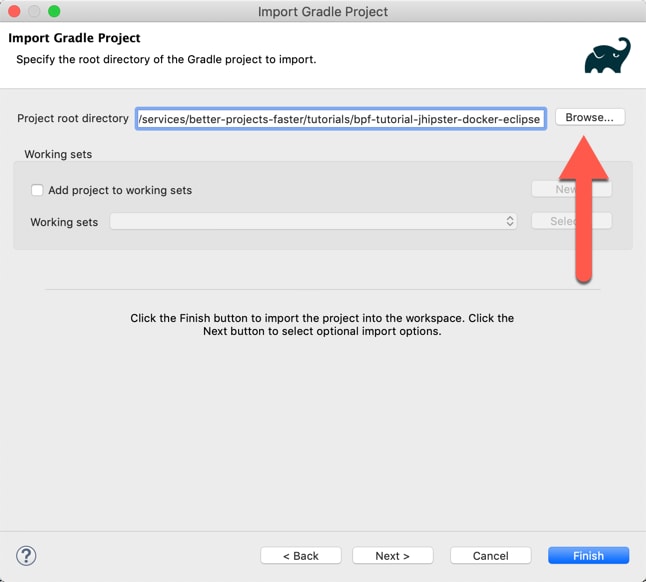
- On the next screen, push Browse… and select the directory where the tutorial project resides on your computer. Then push Finish:
- You may get an error now where Eclipse failed to automatically share the tutorial project (which is a Git project). If that happens, acknowledge it:

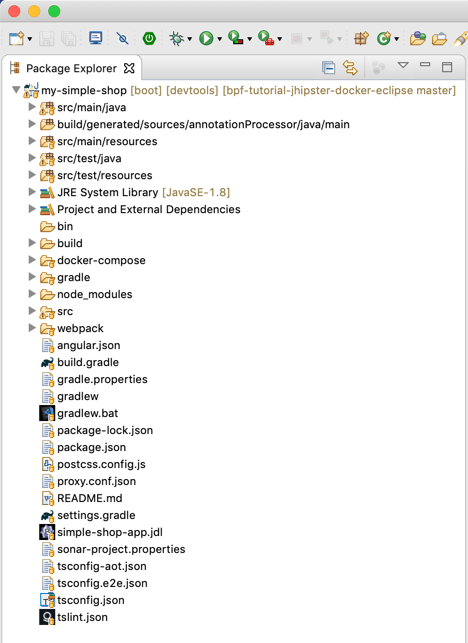
- The explorer window should now show your new project. It still has the wrong JDK, but we’ll fix that in the next section:
Eclipse: Changing the project configuration
Now that we have our tutorial project in Eclipse, we need to make sure it runs with JDK 11:
- Right-click on your project in the explorer window on the left and select Properties to open the tutorial project settings.
- Navigate to the Java Build Path settings, Libraries section, select the JRE System Library and push the Edit… button:

- In the next dialog, select the Workspace default JRE option (which you set to JDK 11 in the previous section) and push Finish:

- Navigate to the Java Compiler settings and select “11” as the Compiler compliance level:

- Push Apply and Close to save your settings. When Eclipse asks to rebuild the project, select Yes:

- Now you should see JDK 11 as the JRE System Library in the explorer window:

Eclipse: Running the project
Finally, we can run the tutorial project in Eclipse!
- Select the project in the explorer window.
- Now either use the Run — Run as… — Spring Boot App menu, or push the green Run button (with the “play triangle”) in the toolbar and then select Run as… — Spring Boot App:

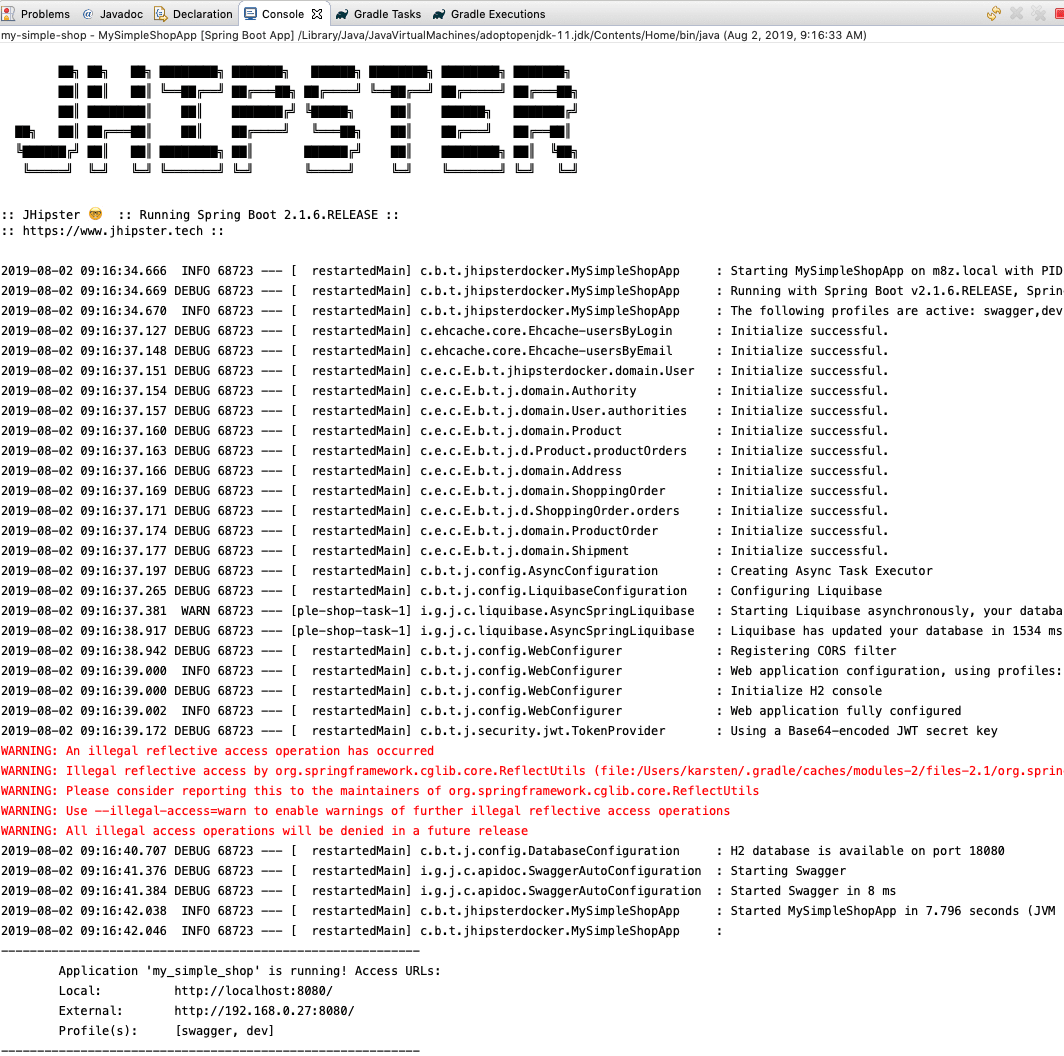
- The application starts now. You should see the following output in the Eclipse console view:
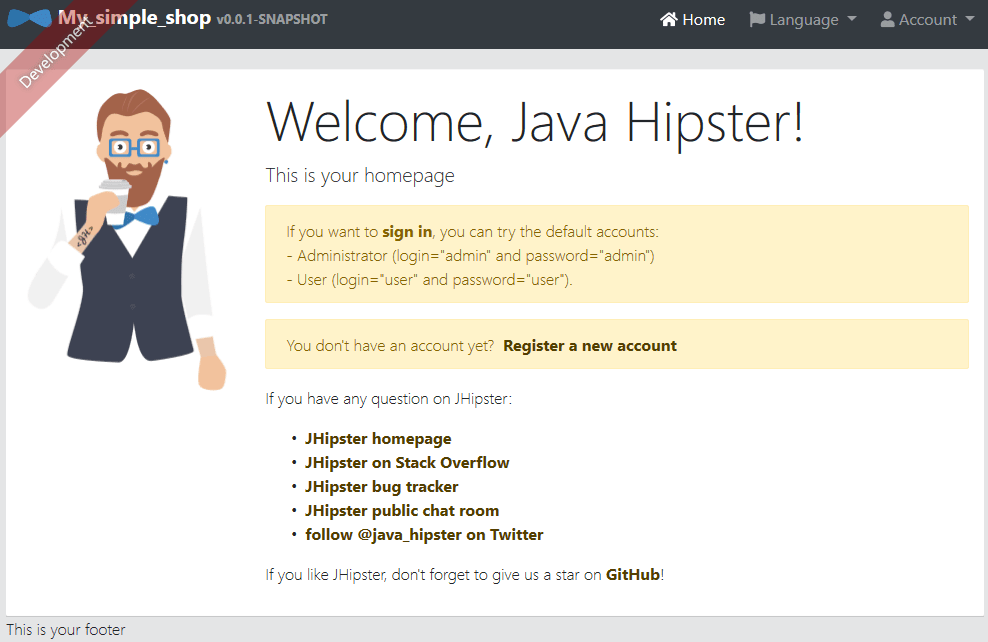
- Now open “http://127.0.0.1:8080/” in your browser to see the application running:
Congratulations — you just imported and ran the tutorial project in Eclipse!
IntelliJ: Existing Installation
If you prefer IntelliJ as your IDE and already have the Ultimate Edition installed, then please make sure that you have the right plug-ins for Angular and Spring Boot enabled. They are listed in the next section. After that, please continue with the IntelliJ: Changing the Global Configuration section.
IntelliJ: New Installation
If you prefer IntelliJ as your IDE, then note that you’ll need the Ultimate Edition because only that edition supports TypeScript (used by Angular) and Spring Boot. You have to buy the Ultimate Edition, but the version you can freely download acts as a trial version, too.
So head over to the IntelliJ download area and download the Ultimate Edition. It is version “2019.2” as of August 15, 2019. Then please install it on your machine:
- Windows
Run the installer. - Mac
Open the installer image and drag the application into your Applications folder.
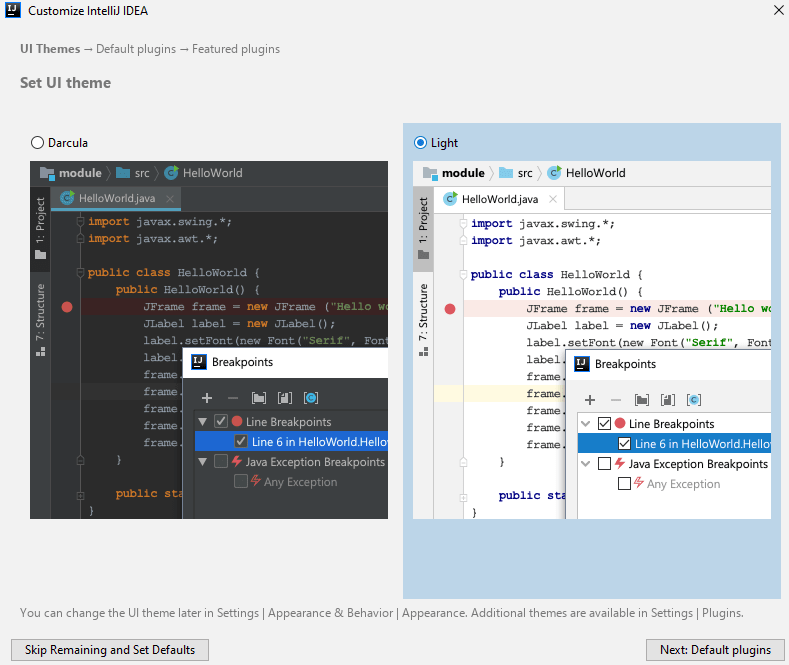
When IntelliJ starts for the first time, it shows a series of customization screens:
- You first pick a UI theme. I prefer Light, but your mileage may vary:
- Push the Next: Default plugins button to get to the default plug-in configuration screen which is divided into sections. Here we’ll disable all the plug-ins we don’t need for our tutorial project. Why? Because the fewer plug-ins IntelliJ has, the faster it runs, and the fewer resources it uses. The screen will eventually look like this:
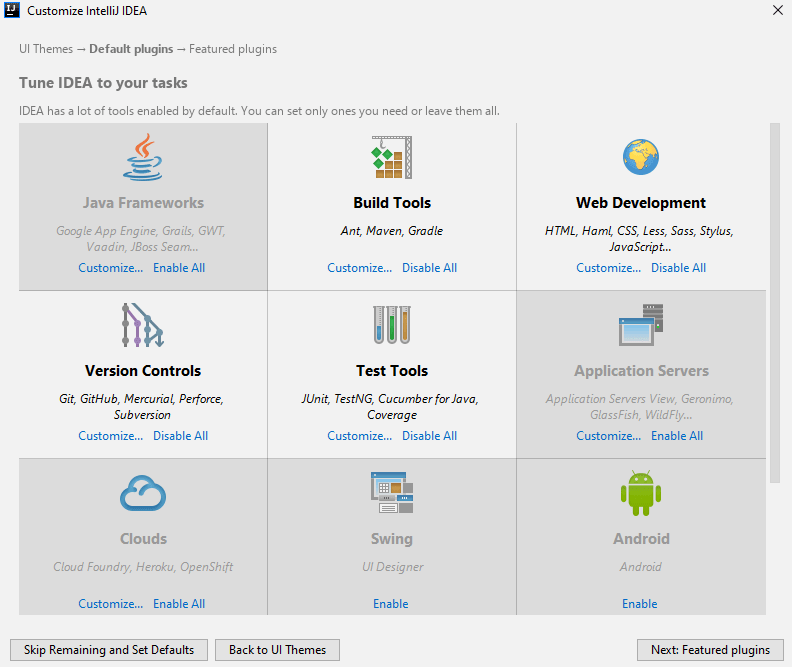
- The first change we’ll make is to deselect Java frameworks. Select the Customize… link in the Java Frameworks section and only keep these entries checked:

- Then push Save Changes and Go Back to save your choice. Now pick the Customize… link in the Build Tools section and keep only Gradle around:

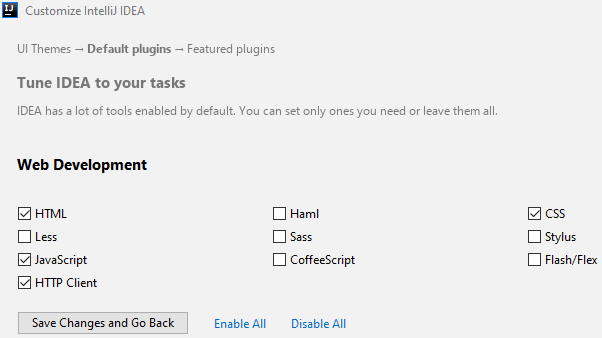
- Now push Save Changes and Go Back and select the Customize… link in the Web Development section. Make sure these options are enabled:
- Click Save Changes and Go Back and hit the Customize… link in the Version Controls section. We only need Git and Github (because it’s the most popular Git repository):

- Use Save Changes and Go Back and then pick the Customize… link in the Test Tools section. Check these values:

- Push Save Changes and Go Back one last time.
- Now you disable entire sections with their respective Disable links:
- Application Servers
- Clouds
- Swing
- Android
- Plugin Development
- We leave the section for Database Tools and Other Tools untouched. The lower half of the screen should now look like this:

- Click Next: Featured plugins to see plug-ins that many users downloaded. We don’t need any of them, so push Start using IntelliJ IDEA:

- This brings us to the IntelliJ start screen:

IntelliJ: Changing the Global Configuration
Now we need to make sure that IntelliJ can actually run our JHipster project:
- Please select the settings from the start screen:

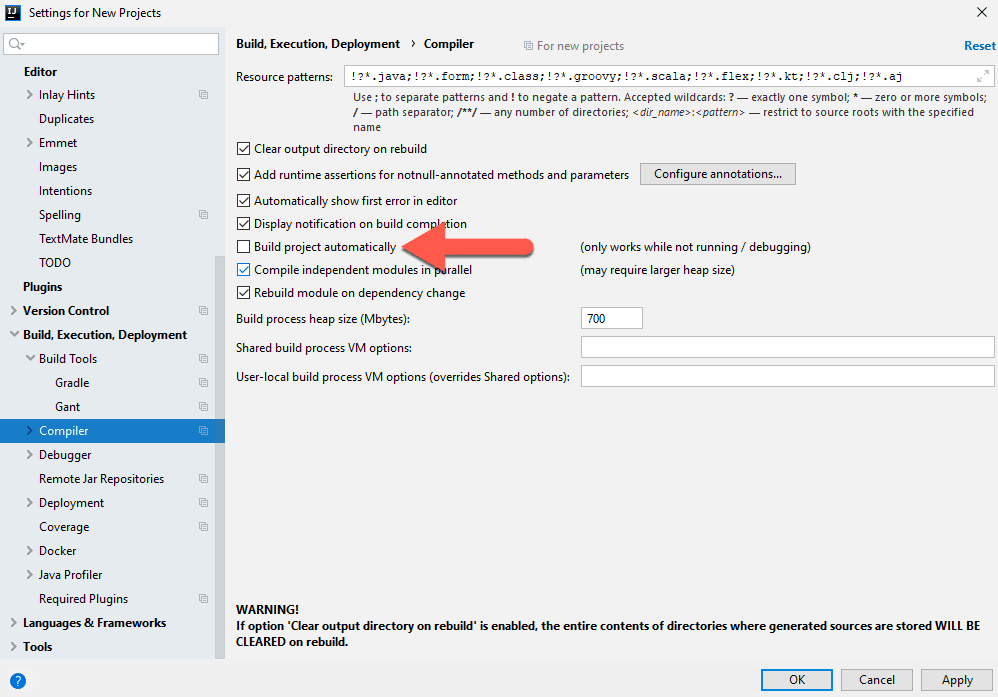
- Navigate to the Build, Execution, Deployment — Compiler section. You can enable all options, except for Build project automatically. Spring Boot will reload the server after a project build, so you want to be in control of that by only building manually. And in IntelliJ versions before 2019.2, this setting accidentally enabled the internal IDE build system due to a bug, even if you had the build system configured to Delegate to Gradle.
- Now stay in the Build, Execution, Deployment section and go to Build Tools — Gradle. There are four important settings
here:
- Automatically import this project on changes in build script files should be unchecked. Otherwise, IntelliJ will constantly import Gradle if you change any of the build files. Instead, just edit all the Gradle files you want and then use the friendly reminder to re-import Gradle that IntelliJ automatically shows you in the bottom right of the screen.
- For both Build and run using and Run tests using, pick “Gradle”. This makes Gradle the build system, as we decided upon at the beginning.
- For the Gradle VM, pick the JDK 11 that we that installed in the second installment of this tutorial.

- Push OK to get back to the start screen. Now select the plug-in configuration:

- Here you enter “spring” in the search field and enable the plug-ins you see below. We chose “Spring” as a Java framework during setup in the previous section, so I’m not sure why they were all disabled during my test. This step ensures that all the Spring plug-ins we need are ready.
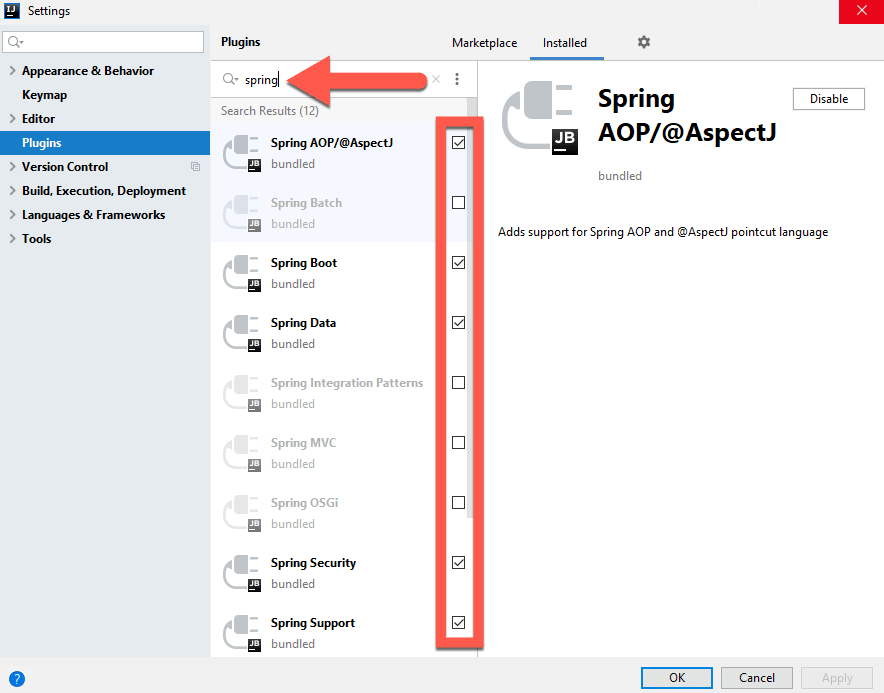

- Push OK and restart IntelliJ to enable the Spring plug-ins.
IntelliJ: Importing the tutorial project
Let’s import the tutorial project into IntelliJ:
- From the start screen, select Import Project:

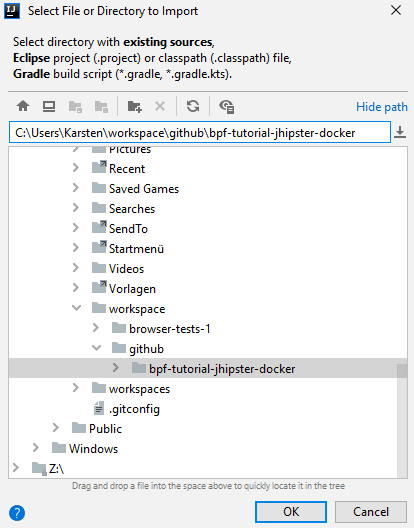
- Next, pick the directory where the tutorial project resides and push OK:
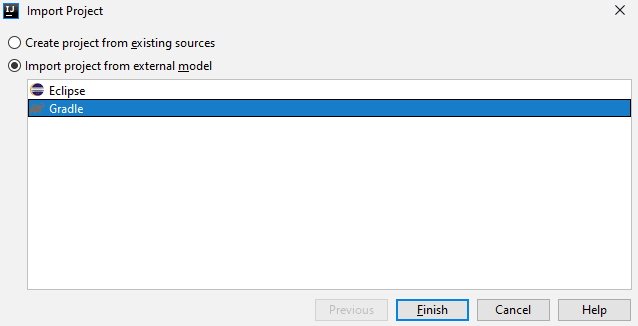
- Now select Import project from external model, then choose Gradle and hit OK:
- IntelliJ now imports your project for real. After a while, you’ll see these two messages pop up in the bottom right corner. We
need to take care of them.
Windows only: You may see a third message where IntelliJ points out that Windows Defender (the built-in virus and malware protection) slows down your build. In that case, let IntelliJ configure Windows Defender for you.

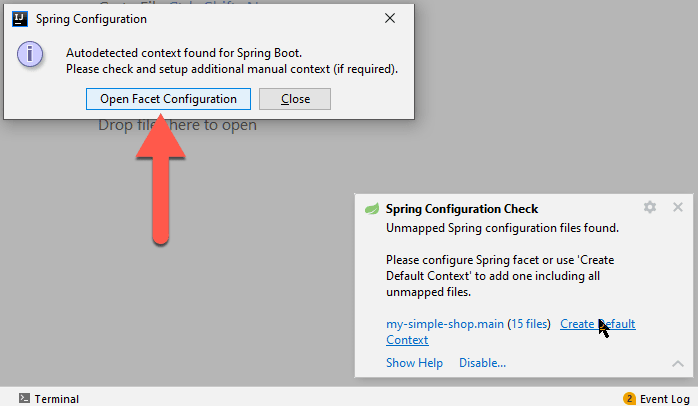
- Expand the Spring Configuration Check message with the triangle in its top-right first and then select the Create Default Context link:

- Now a Spring Configuration dialog box pops up. Push the Open Facet Configuration button:
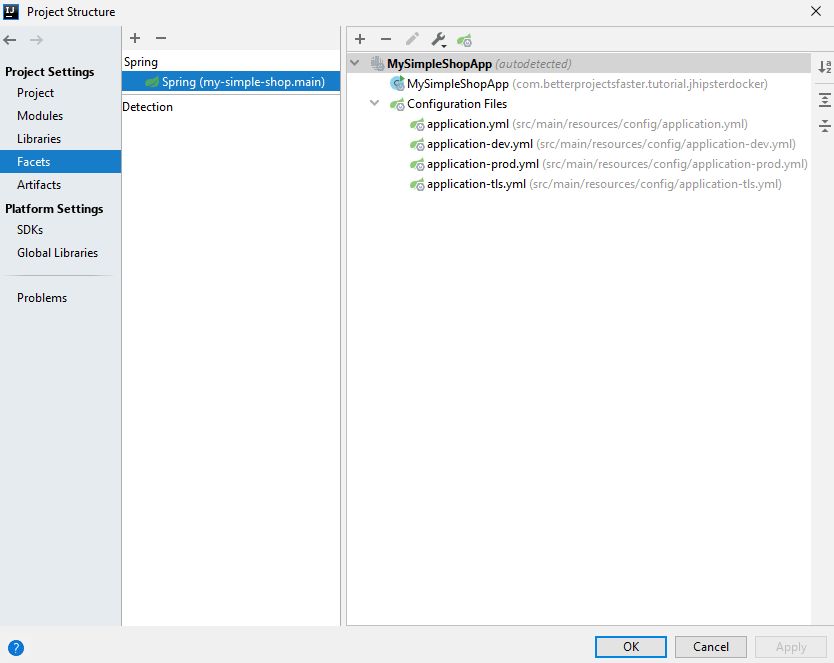
- This leads you to the project settings. Go to the Facets section and make sure that there’s a Spring facet. Then push OK:
- The Spring Configuration Check message should be gone now. Let’s address the Frameworks Detected message next by clicking its Configure link. This opens up a new window:
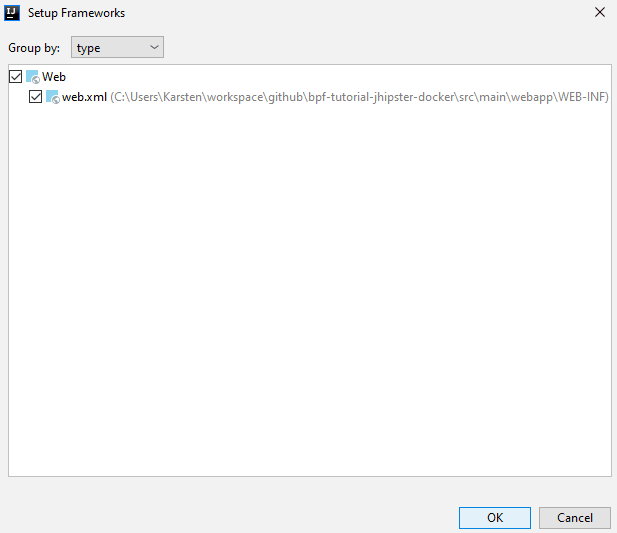
- Just hit OK to acknowledge the web application configuration. Hopefully, there are no more messages by now, and the Project View shows our tutorial project:

IntelliJ: Changing the project configuration
Now that the project is imported, we still need to change some of its configuration:
- The Project View shows three build directories, two from Gradle (.gradle and build) and one from Angular (node_modules). They take up space in the view and probably some resources, too (node_modules has nearly 75.000 files on my machine!). So it’s best to hide them — you can always view them outside IntelliJ. So click the gear icon in the top right of the Project View and uncheck Show Excluded Files:
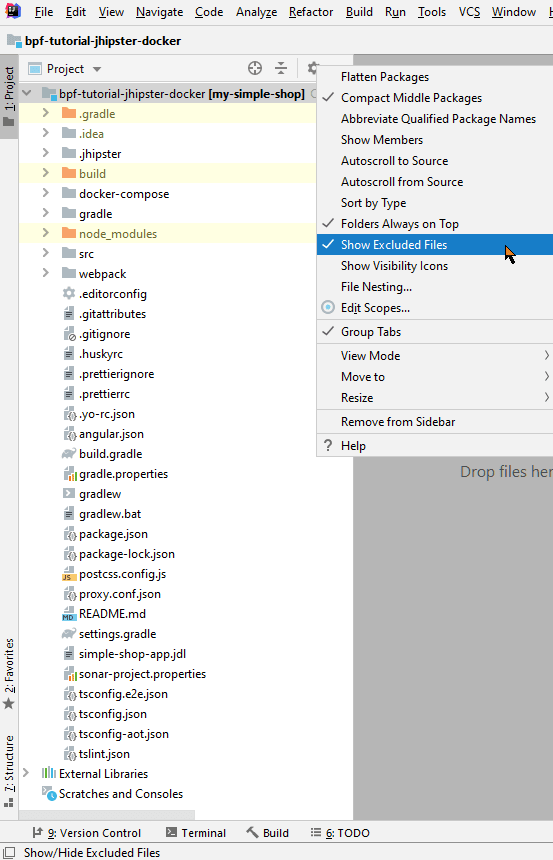
- The Project View now has no more build directories:

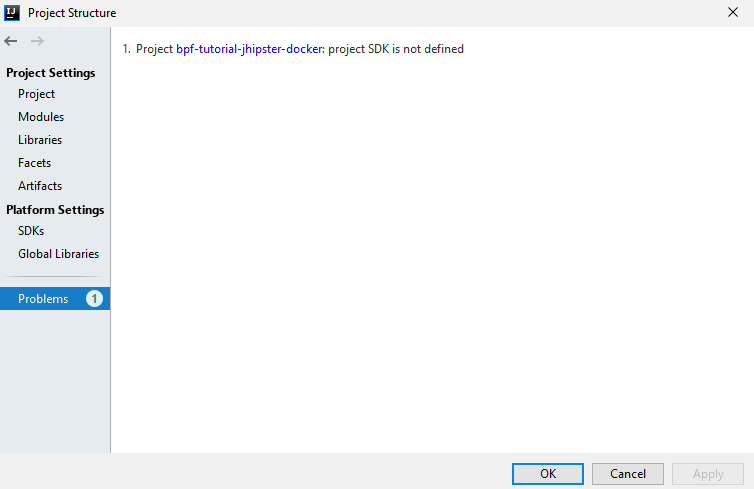
- Now right-click on the project, the top level in the Project View, and select Open Module Settings. Check out the Problems section where IntelliJ may complain about a missing JDK:
- So head over to the SDKs section where you probably see that the built-in JDK that runs IntelliJ is the only JDK available. Now let’s bring in the JDK 11 that we that installed in the second installment of this tutorial. Click the + at the top and then select JDK:

- Now point IntelliJ towards the directory where you installed the JDK. That’s probably C:\Program Files in Windows and /Library/Java/JavaVirtualMachines on macOS:
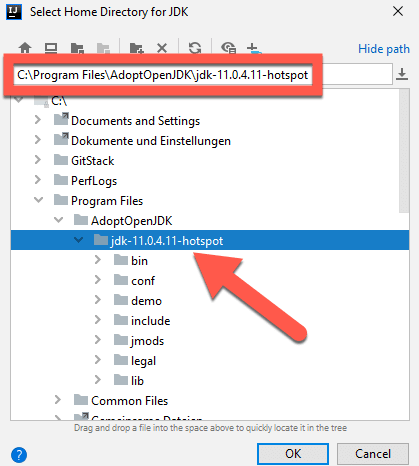

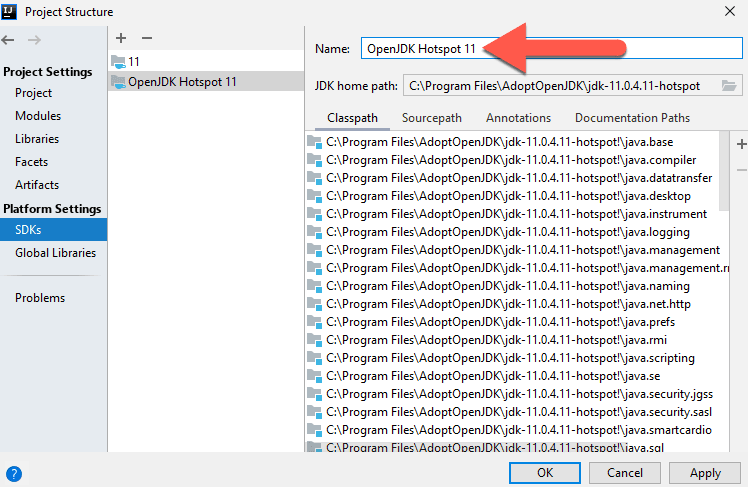
- Once you picked the right directory, give the new JDK a descriptive name, such as “OpenJDK Hotspot 11”:
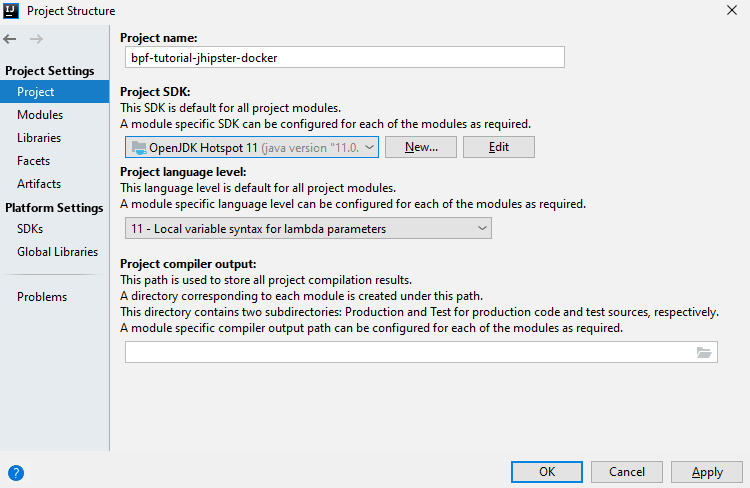
- Let’s fix our missing JDK by navigating to the Project section. IntelliJ points out the missing JDK:

- So pick the just defined JDK here as the Project SDK and select “11” as the Project language level:
- Now head over to the Modules section and set the Language level to “11” for both the main module and the test one:


- Take a look at the Facets section again - it should now have two entries, one for the main module and one for the test one:

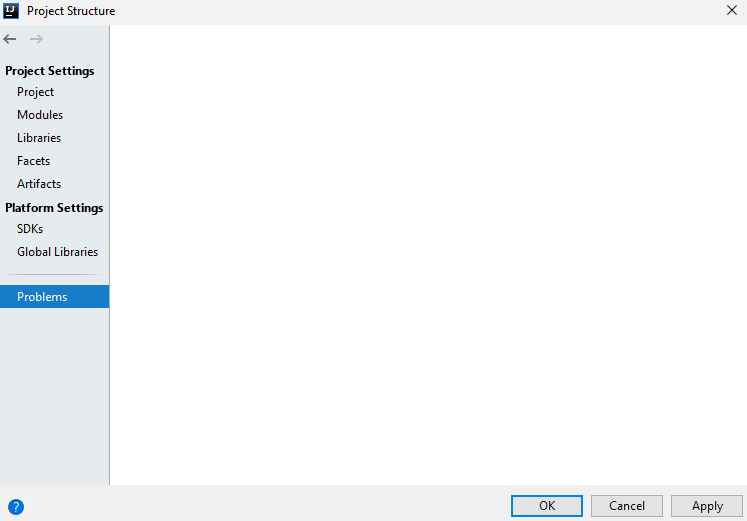
- Our final stop is Problems once more. There shouldn’t be any:
- When you push OK now, the project may be rebuilt. Just be patient.
IntelliJ: Running the project
At long last, we can run the tutorial project in IntelliJ! Well, actually, we can’t. 😭
We first have to define a Run Configuration. So let’s get going:
- Click the Add Configuration button in the toolbar:

- In the Run/Debug Configuration window, click the + button in the top left and select Spring Boot from the template list. If that entry doesn’t show immediately, please click the X more items… link at the end of the list:

- This creates a new Spring Boot configuration. But as you can see from the little red cross on the left, it’s not working right now. Time to right this wrong! First, we need to set the main class. Push the button on the right to do so:
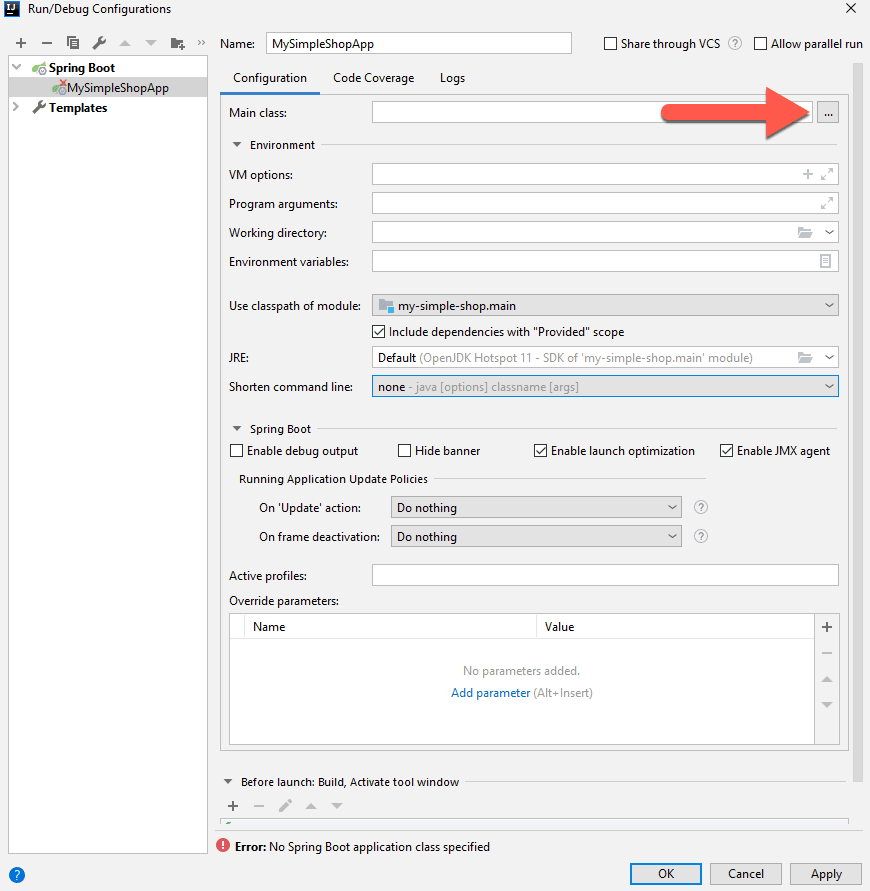
- In the next window, click inside the search field at the top. This should automatically yield “MySimpleShopApp” as the one search result. If not, then start typing “MySimpleShopApp”:
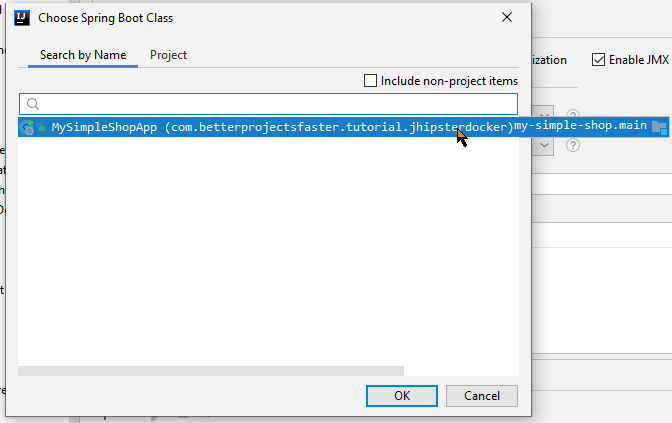
- Click OK to confirm your class. Now on the next screen, you need to make some changes. Please see the screenshot below for help:
- Change the Name to “Back-End” at the very top. Why? Because during development, you’ll run Angular (the “front-end”) in its own process, and Spring Boot is then “just the back-end.” Once you change the name, it’ll automatically update on the left in the list of configurations.
- Make sure that in the Environment section in the middle of the form, the Use classpath of module drop-down is set to “my-simple-shop.main.”
- Right underneath that field, JRE must show the same JDK that you defined and set as the project SDK in the previous section.
- Again right below that field, you’ll find Shorten command line. What’s that all about? Your Spring Boot application is a Java application after all, run with “java …”. Now with Java 8 and on Windows only, the command to start Spring Boot was too long for Java 8 (I believe longer than 128 characters), and the application didn’t start at all. Java worked fine on macOS. So creating a “JAR manifest” and moving some command line parameters there was one of the ways to, well, shorten said Java command line in Windows. It seems that with Java 11, the long Java command also works on Windows. So you probably could select “none” here, but just in case, picking “JAR manifest” will definitely solve the issue and do no harm when the long Java command would work anyway.
- In the Spring Boot section towards the bottom, add “dev” to the Active Profiles. Why the plural here? You can have multiple profiles in Spring at the same time. And JHipster applications actually have — you’ll see the “swagger” profile in a minute.
- Finally, make sure that at “Build” is listed in the Before launch section. This ensures your Java code is compiled before you start. It should there by default, so this is just a check.
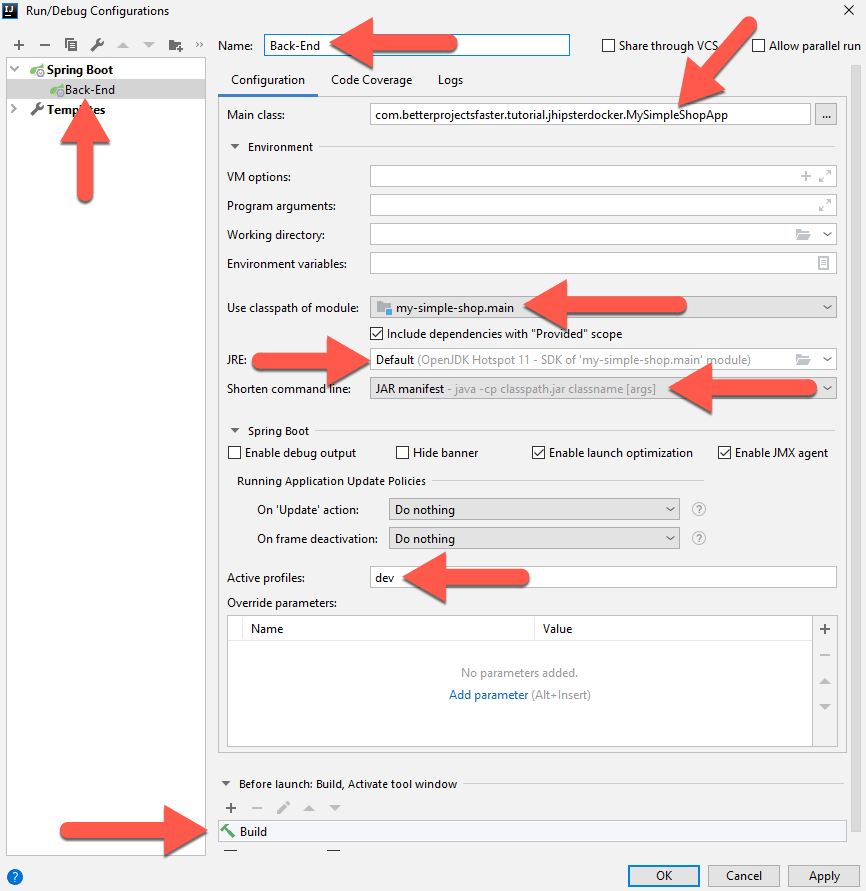
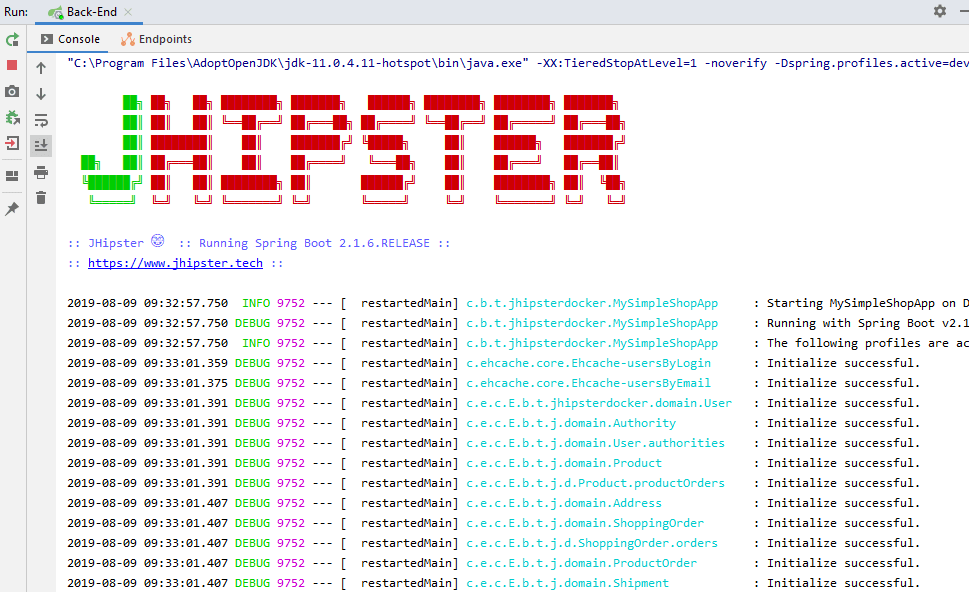
- Now push OK. Your new Run Configuration should be available now:

- Click the green “Run” triangle to the right of the configurations drop-down to start your project. The console then shows the application log output:
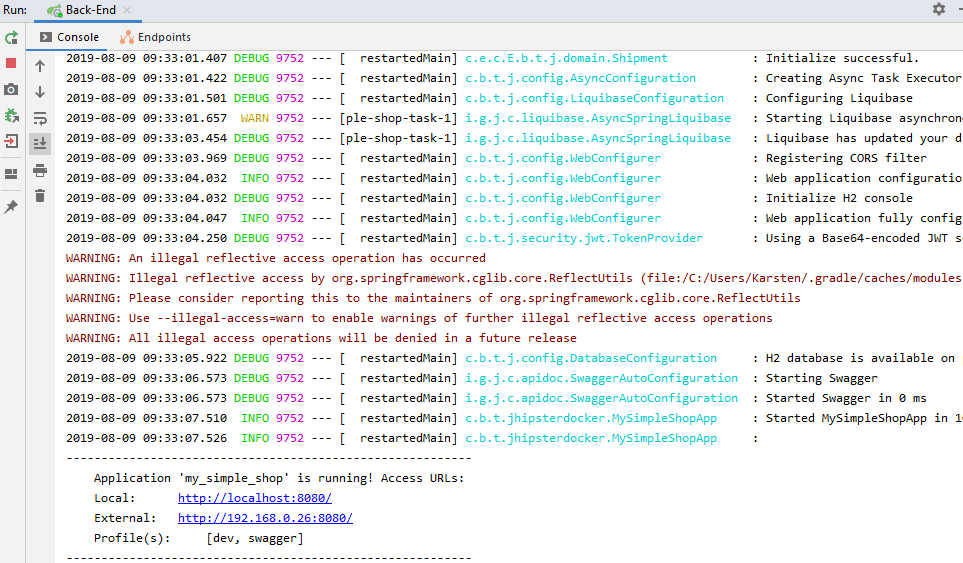
- Now open “http://127.0.0.1:8080/” in your browser to see the application running:
Congratulations — you just imported and ran the tutorial project in IntelliJ!
Sources: Build System & Configuration
Now that we’ve imported and ran the project in both Eclipse and IntelliJ, let’s take a look at the generated source files, shall we? We start with the build system and focus on unique touches that JHipster brings to our project.
- Below is a snippet from the Gradle build file
build.gradlefor our Java back-end. It highlights how you can easily restrict which Java version can build the project. And yes, we could just leave “11” in there to lock us down to Java 11.

gradle.propertiesholds the version number for the most critical dependencies. Here you can see the Long Term Support (LTS) version 10 of Node, Spring Boot 2.1.6 and Hibernate 5.3.10.

- JHipster added some Gradle tasks in
gradle/profile_dev.gradle. If you ever wonder why starting Spring Boot triggers an NPM install, here is the answer:bootJardepends onprocessResourceswhich depends onwebpackBuildDevwhich in turn depends onnpmInstall. So just commenting out that last dependency will shave off a couple of seconds from every build!

- Angular has a build file, too — it’s
package.json. Angular 8 and Bootstrap 4.3.1 are the essential dependencies:

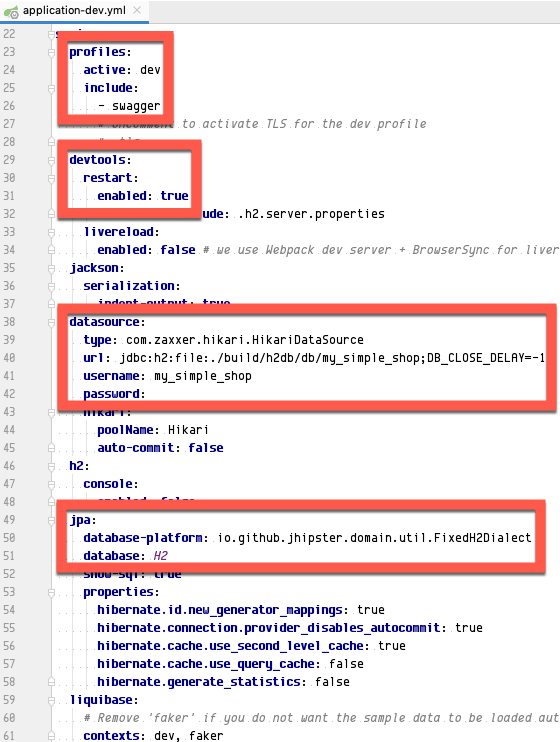
- JHipster only uses YAML configuration files. It has a common config for all profiles file with
src/main/resources/config/application.yml. But below you seesrc/main/resources/config/application-dev.yml, which contains the configuration for — you probably guessed it — thedevSpring profile. It- activates the
swaggerprofile, - enables the Spring Boot Developer Tools, and
- sets up the embedded database H2 to store its data file in the
builddirectory. That’s why agradle cleangives you a fresh database start — nice and easy!
- activates the
- There’s also a fair amount of Java configuration classes in the
com.betterprojectsfaster.tutorial.jhipsterdocker.configpackage insrc/main/java. I picked ‘SecurityConfiguration.java’ (which secures URLs) as a sample.- The first red box in the screenshot below has special REST API URLs that users can access who are not logged in
(
.permitAll()). - The second box, on the other side, shows that all other REST API URLs require you to be logged in (
authenticated()). And only users with the role “ADMIN” can access/websocket/tracker.
- The first red box in the screenshot below has special REST API URLs that users can access who are not logged in
(

Sources: Java
Build files are all fine and dandy, but let’s see some real code in the Java back-end!
- It all starts with the database. In the case of JHipster, this means Liquibase, which creates and
alters tables and loads data for multiple database systems. As you can see below, it is the only XML configuration holdout in our
project — so much for the “real code” I just promised! The screenshot shows
src/main/resources/config/liquibase/master.xml, the main config file.- The first box contains definitions of types and functions that differ among database systems.
- The second box has table definitions, both for the built-in JHipster tables (
00000000000000_initial_schema.xml) and the tables that house the entities derived from the JDL file (201908011227**_added_entity_*.xml). - Files with definitions of indexes and foreign keys are in the last box.

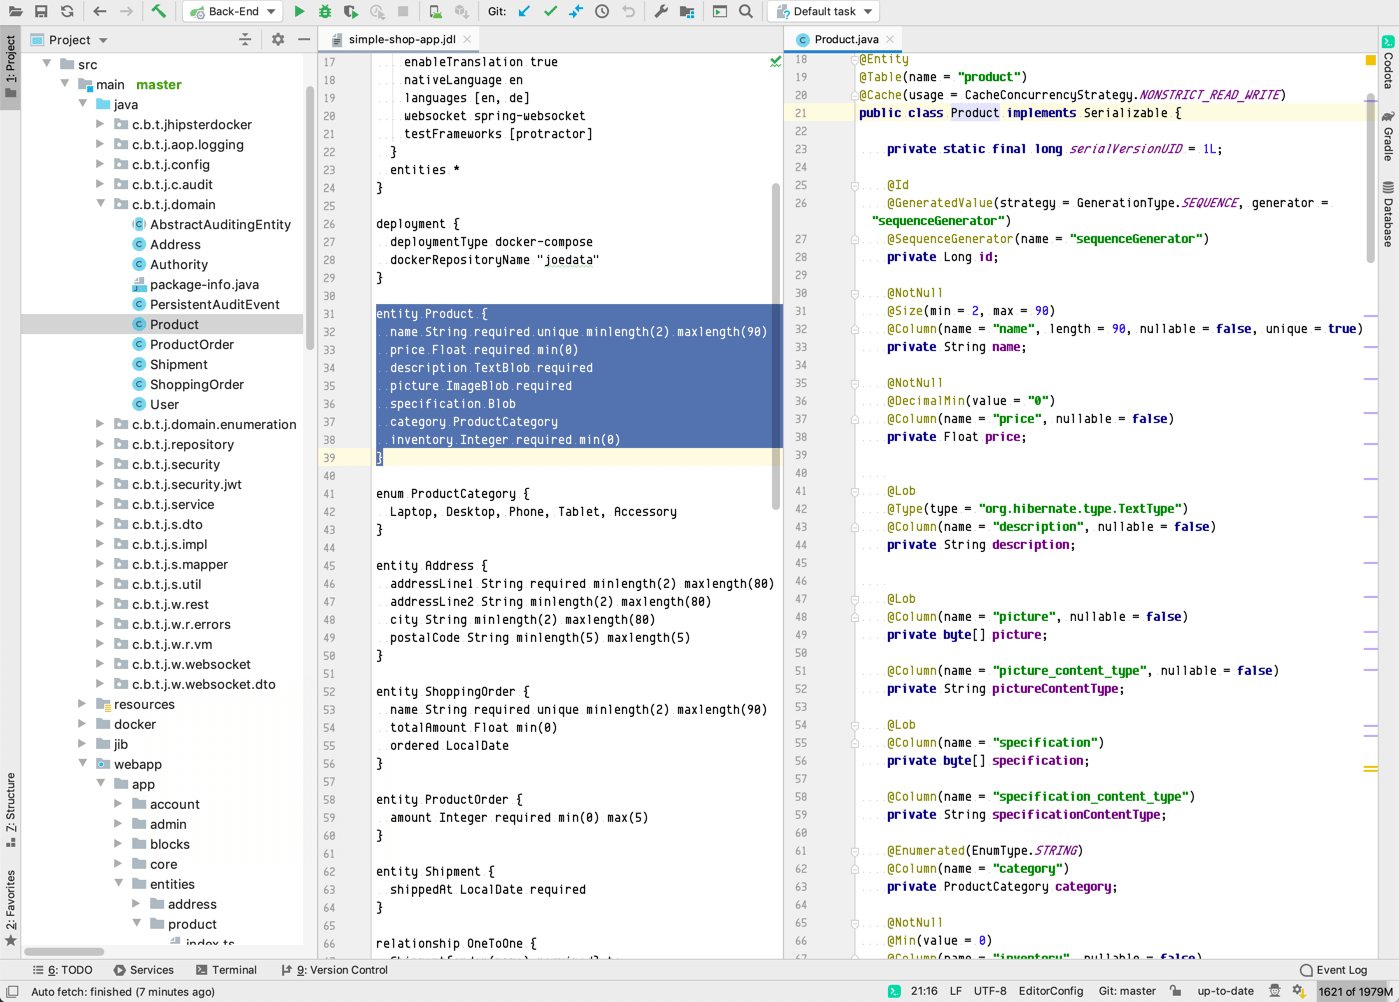
- Next is the table definition for our “Product” entity in
src/main/resources/config/liquibase/changelog/20190801122745_added_entity_Product.xml. It really is a SQL table definition in XML!

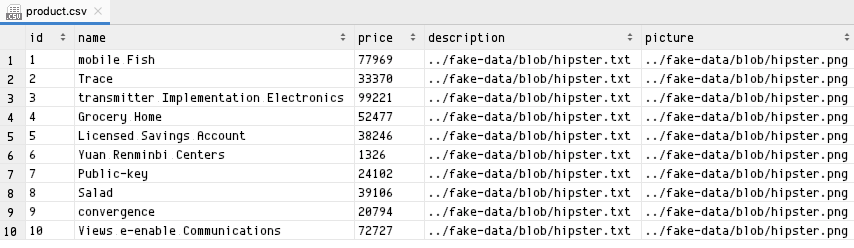
- Liquibase allows loading data from CSV files into tables. Below is “fake data” that JHipster generated for our “Product” entity in
src/main/resources/config/liquibase/fake-data/product.csv. Wonder why it looks like a table in IntelliJ? This is the work of the CSV Plugin that comes highly recommended!
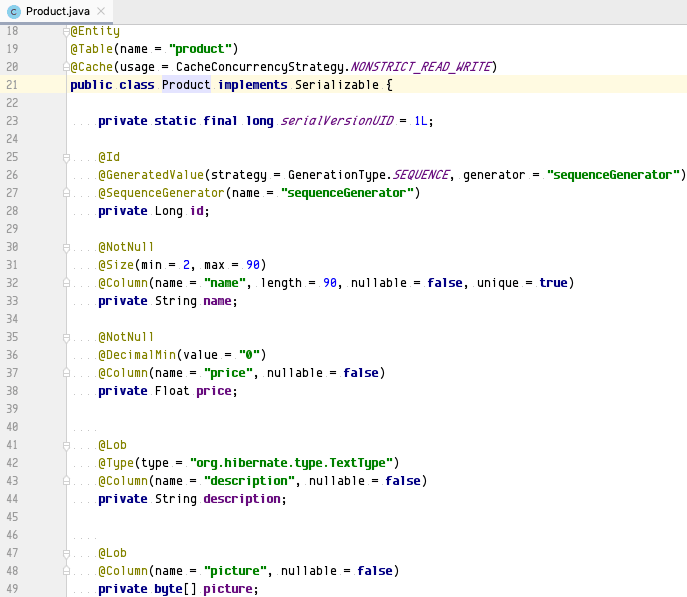
- Finally, some Java code! Fittingly, it’s the JPA entity for “Product”
com.betterprojectsfaster.tutorial.jhipsterdocker.domain.Productinsrc/main/java. It has plenty of annotations.
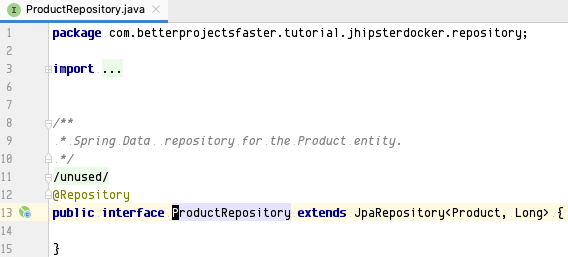
- Next, we have the database queries for the “Product” entity with
com.betterprojectsfaster.tutorial.jhipsterdocker.repository.ProductRepositoryinsrc/main/java. And no, this is the right screenshot — it’s an interface, not a class, and it doesn’t actually define any queries! How does that work? JHipster uses Spring Data JPA. That library uses interfaces for database query definition and generates implementation classes during the Gradle build. It ships with default CRUD queries (create, read, update and delete) in theJpaRepositorywhich our interface extends. And since we don’t need any other queries right now, that interface is empty.
- Because we specified the usage of Data Transfer Objects (DTO) for all our entities, JHipster happily obliged and created them for
us. Here’s the one for the product, mirroring the entity two bullets back. It’s
com.betterprojectsfaster.tutorial.jhipsterdocker.service.dto.ProductDTOinsrc/main/java.

- So, how do we get a DTO from an entity again? I’m glad you asked! That’s the job of Mapstruct, a library
that translates between JPA entities and DTOs for us. You may recall that I held up that library as Exhibit B in my case against
IDE builds ten minutes ago at the beginning of this tutorial. Just as with Spring Data JPA, you define an interface, and Mapstruct
generates implementation classes during the Gradle build. The mapper interface for products is
com.betterprojectsfaster.tutorial.jhipsterdocker.service.mapper.ProductMapperinsrc/main/java. Now when Mapstruct translates between two classes and finds an attribute with the same name and type in both, it copies over that attribute data automatically. So in the interface, you specify exceptions — which attributes to ignore or which attributes to fill from “special methods.” An example for such a “special method” could begetDisplayName()on aUserentity which would return the first name if one exists, then the last name if one’s there, and finally the login name if all else fails.
Anyhow, that long-winded explanation makes it hopefully more evident why the product mapper in the screenshot below only has two annotations that tell it to ignore two entity attributes when copying over from a DTO. I use the term “entity attribute” here in a rather loose sense becauseremoveProductOrderis not an attribute but — as the name suggests — an entity method that removes an order from a collection. That seems to be a bug in Mapstruct that your humble author found and reported (it’s #9726).

- The business service interface
com.betterprojectsfaster.tutorial.jhipsterdocker.service.ProductServiceinsrc/main/javauses that DTO. The interface combinescreate()andupdate()in onesave()method:

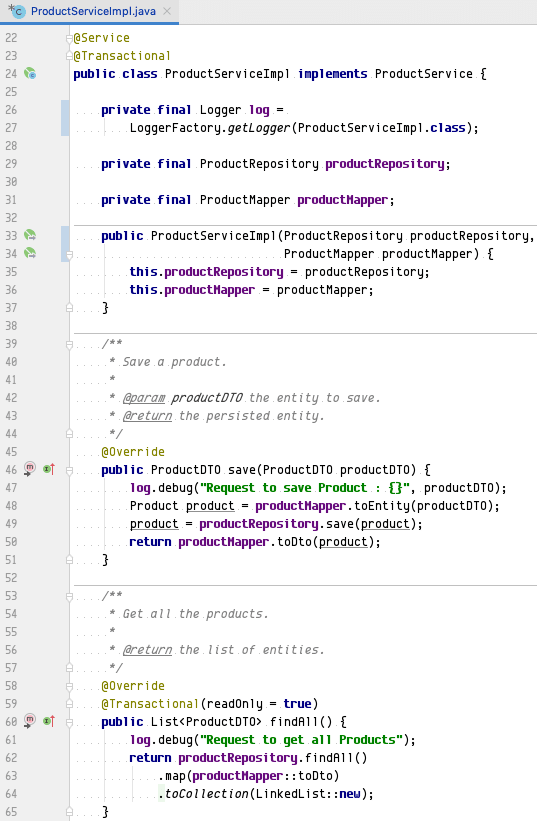
- The business service implementation is
com.betterprojectsfaster.tutorial.jhipsterdocker.service.impl.ProductServiceImplinsrc/main/java. You can see the first two methods here which simply call the repository and the mapper without further ado:
- The last frontier on the Java side is the REST API in the form of a Spring REST controller. Here we got the
com.betterprojectsfaster.tutorial.jhipsterdocker.web.rest.ProductResourceinsrc/main/java. ThecreateREST API call is an HTTP POST request to/api/productsand simply calls the business service method:

Sources: Angular
The last stop on our trip down source lane is Angular.
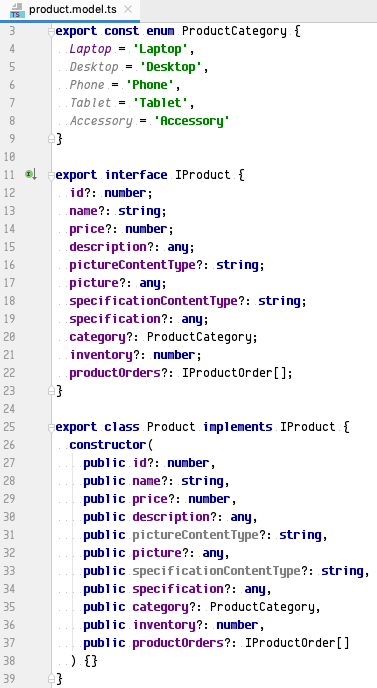
- Let’s start with the model, which is the Angular equivalent of the Java DTO. All Angular components for that entity use that
model. Here we have the product model, which is
app/shared/model/product.model.tsinsrc/main/webapp. JHipster always generates an interface and a class with optional attributes (see the “?” after each attribute name). We also got anenumdefinition at the very top of the file.
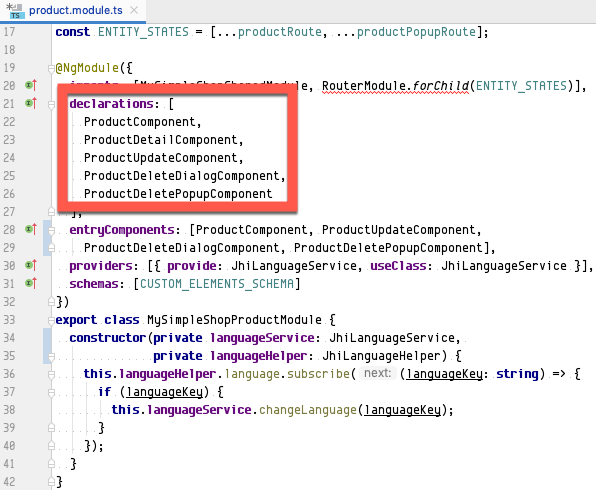
- JHipster creates a module for each entity with five components. You can see the product module below. It’s
app/entities/product/product.module.tsinsrc/main/webapp.(entity name)Componentis the table with a list of all entities.(entity name)DetailComponentis the read-only view of a single entity.(entity name)UpdateComponentis the form for creating or updating a single entity.(entity name)DeletePopupComponentdeletes a single entity after confirming with an “Are you sure?” dialog in(entity name)DeleteDialogComponent.
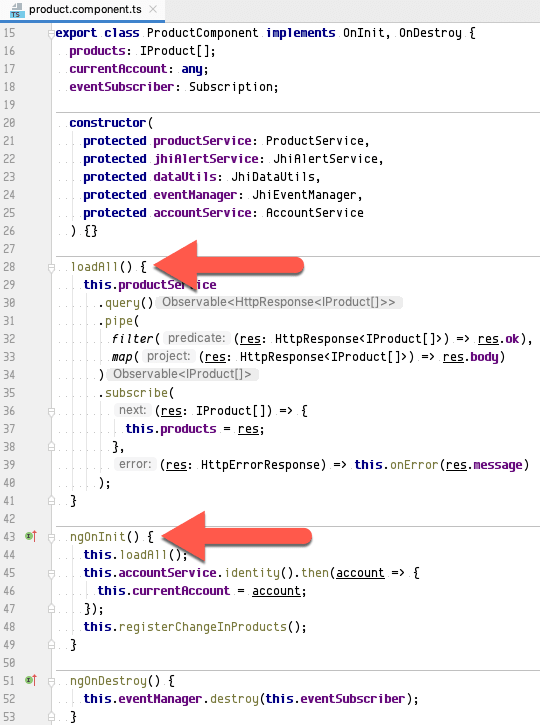
- Now we check out the Typescript class of the Angular component for showing the entity table (
ProductComponentin the screenshot below). JHipster creates aloadAll()method that retrieves all entities from the back-end and invokes that method in thengOnInit()Angular lifecycle call. The example below is fromapp/entities/product/product.component.tsinsrc/main/webapp.
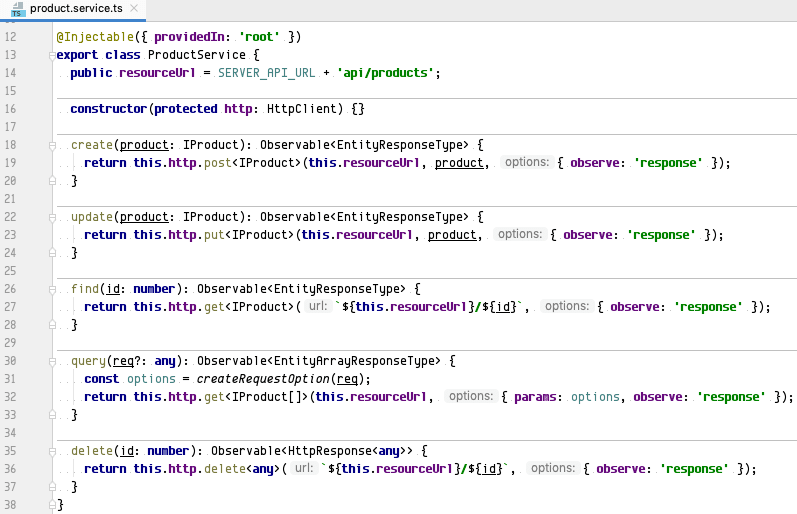
- The
loadAll()method from the previous bullet uses a service class. Here is that class:app/entities/product/product.service.tsinsrc/main/webapp. It has five methods for CRUD (there are two read methods —query()for multiple products andfind()for a single one) that call our Java REST API. JHipster only generates more complicated code when a class has date or time attributes because they need to be converted before being sent to or after being received from the REST API.
- The HTML template that shows all products is
app/entities/product/product.component.htmlinsrc/main/webapp. It is a plain table but uses two pieces of functionality that JHipster brought to the Angular table:- The table headings are localized with the
jhiTranslateattribute. If you recall the second installment of this tutorial, the application supports both English and German. - Pictures are shown directly in the table, and binary files are handed over to the browser. This is the work of the
openFile()method. And yes, that means that the REST API actually contains the binary content of those fields, which is probably not a good idea for production!
- The table headings are localized with the

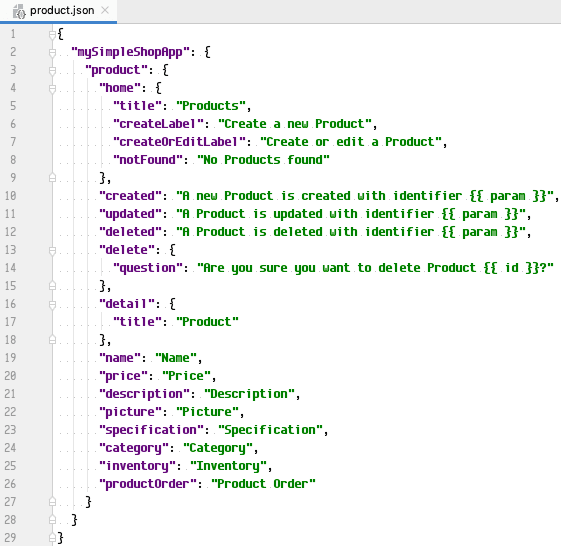
- The localization into English and German needs the actual translations. JHipster generates a JSON file per entity and language for
that. Here is
i18n/en/product.jsoninsrc/main/webapp, the English translation resource file for the product.
Wrap-up
This concludes the third tutorial installment. What have we accomplished?
- We installed or configured either Eclipse or IntelliJ for Spring Boot and Angular.
- We imported the project into either Eclipse or IntelliJ.
- We inspected the code that JHipster created for our entities.
Your project source code should still look like
the “master” branch of the GitHub project — we didn’t
change anything.
Coming up next in the “Better Java Projects Faster with JHipster and Docker” tutorial
In the next installment, we’ll look at the tests that JHipster generated for us and run them. Stay tuned!